This article goes through the basics of using your Olympus transcription kit.
AS-9000
Quick Start Guide for AS-9000 Transcription Kit
This article goes through the basics of using your Olympus AS-9000 Transcription Kit.
Connecting the Foot Control
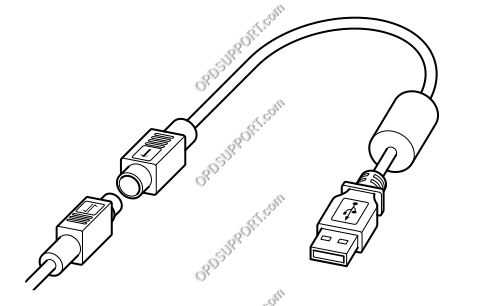
- Connect the foot switch cable to the USB adapter cable. Ensure you align the flat edges of the connector.
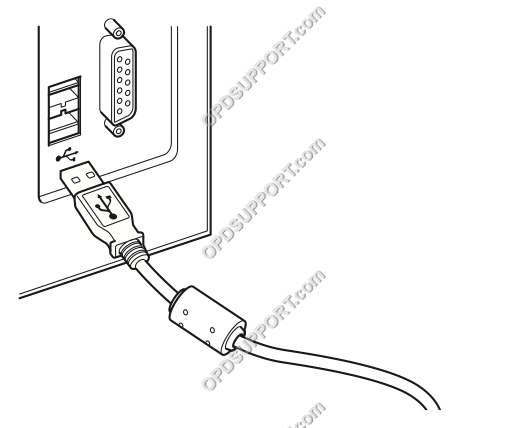
- Connect the USB adapter cable to the PC’s USB port.
- Place the foot control in a comfortable place under the desk ensuring the lead is not obstructing you.
Default Pedal Settings
Button assignment can be customised to your preference please follow the guide here
RS-31H/RS-31
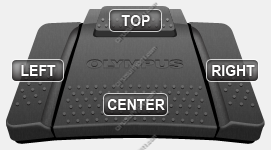
Left = Rewind
Top = Fast Forward
Right = Play
Center = Disabled
Connecting the Headset
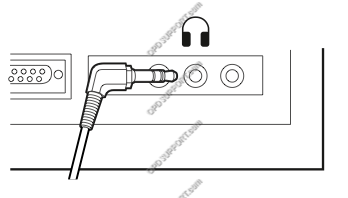
- Plug the headset into the PC’s earphone socket. Do not place the headset to your ears until you have checked and reduced the computer volume.
Familiarising yourself with the Transcription Module
- Double click the Transcription Module icon on the desktop or select for all programs.
Transcription Module – Main Window
ODMS R7
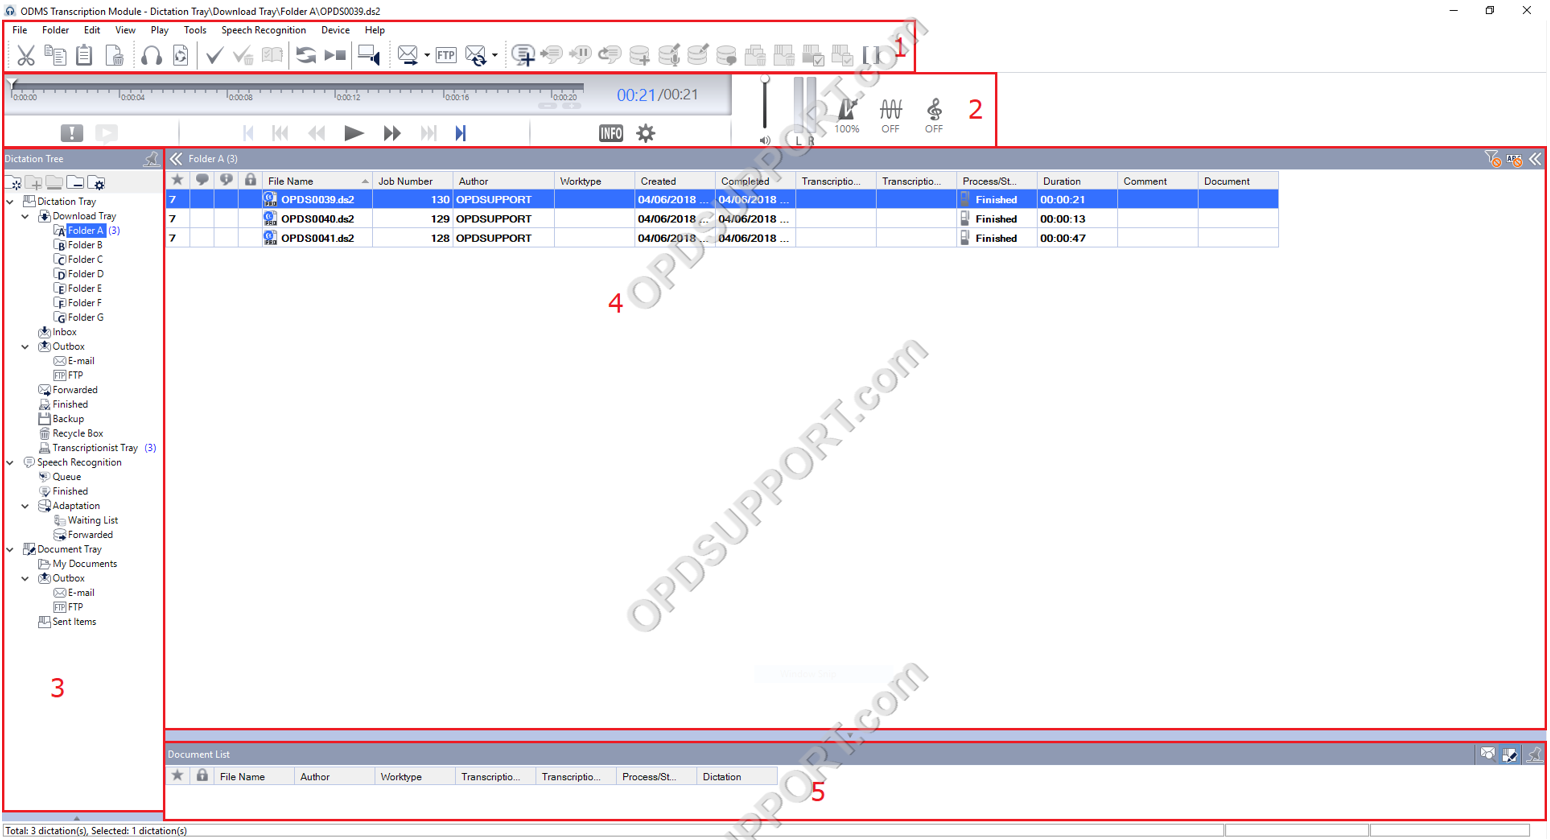
1. Toolbar – Features common task buttons. Hover mouse to view description.
2. Playback Window – Allows manual control of Play, Fast Forward and Rewind. Quickly set Volume, Tone, and playback speed settings.
3. Dictation Tree View – List all folders. Select Transcription Tray for summary overview
4. Content List View – Lists all the audio files for the selected folder. All high priority files remain at the top of the list and are highlighted in red
5. Information Window – Views mail preview (requires Email to be configured) and list transcribed documents (requires Dragon or word processor to be configured).
Receiving Dictations
New dictation files will be delivered to you via the following methods below which the software can be configured to automate the process:
Transcribing Your First File
- Once you received the files in the software double-click on the selected file.
- The main transcribe window will disappear and a small transcribe bar becomes visible.
- Press Play via the foot control to begin audio playback.

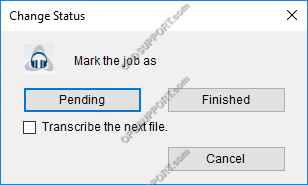
- If you close the Transcribe Bar you will be prompted to mark the file as Pending or Finished.
- If you intend to come back to the file later, then select Pending. The file will remain in the folder and will be marked transcription pending so when you return to the file it carries on where you left off.
- If the transcription is complete, then select Finished. The file will be marked transcription finished and will move to the Finished folder. If you don’t want to change anything then click Cancel. The file will be marked recording finished and will remain in the folder waiting to be transcribed.
Adjusting Personal Preferences
There are a number of personal preferences settings that you can configure in the Transcription Module such as auto-backspace and winding speed please follow the guides below.
Further information
If you want to know more about the Olympus software please take a look at the ODMS R7 GUI overview.
If you want to know about how to use the Speech Recognition features please take a look at the guide here.
AS-7000
Quick Start Guide for AS-7000 Transcription Kit
Transcription
This article goes through the basics of using your Olympus transcription kit.
Connecting the Foot Control
- Connect the foot switch cable to the USB adapter cable. Ensure you align the flat edges of the connector.

- Connect the USB adapter cable to the PC’s USB port.

- Place the foot control in a comfortable place under the desk ensuring the lead is not obstructing you.
Default Pedal Settings
Button assignment can be customised to your preference please follow the guide here
RS-31H/RS-31

Left = Rewind
Top = Fast Forward
Right = Play
Center = Disabled
Connecting the Headset
- Plug the headset into the PC’s earphone socket. Do not place the headset to your ears until you have checked and reduced the computer volume.

Familiarising yourself with the Transcription Module
- Double click the Transcription Module icon on the desktop or select for all programs.
Transcription Module – Main Window
ODMS R6
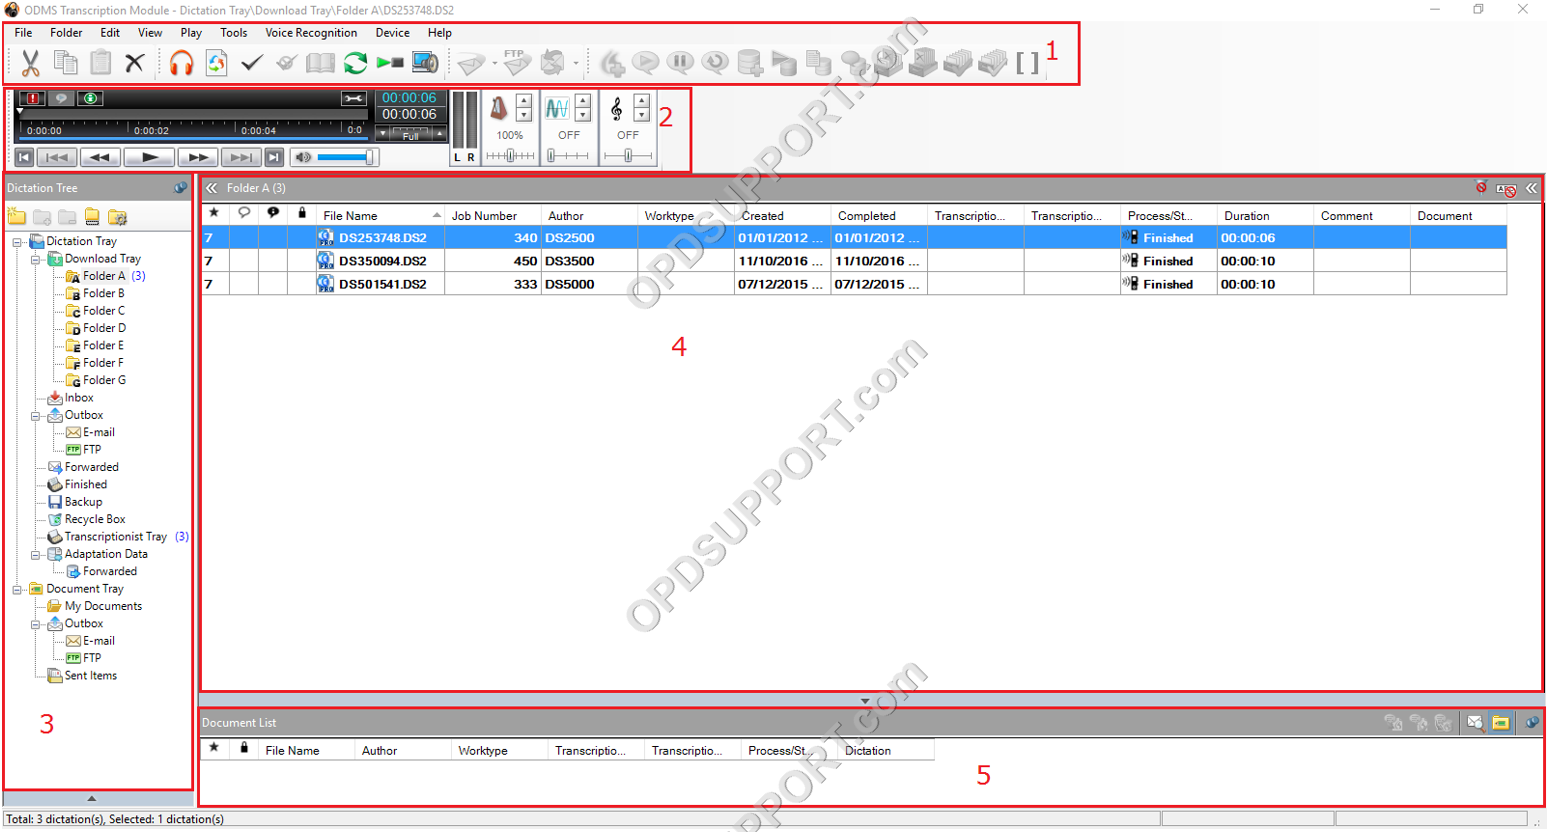
- Toolbar – Features common task buttons. Hover mouse to view description.
- Playback Window – Allows manual control of Play, Fast Forward and Rewind. Quickly set Volume, Tone, and playback speed settings.
- Dictation Tree View – List all folders. Select Transcription Tray for summary overview
- Content List View – Lists all the audio files for the selected folder. All high priority files remain at the top of the list and are highlighted in red
- Information Window – Views voice recognition results (requires Dragon to be configured), mail preview (requires Email to be configured) and list transcribed documents (requires Dragon or word processor to be configured) .
Receiving Dictations
New dictation files will be delivered to you via the following methods which the software can be configured to automatically receive files:
Transcribing Your First File
- Double-click on the selected file.
- The main transcribe window will disappear and a small transcribe bar becomes visible.
- Press Play via the foot control to begin audio playback.
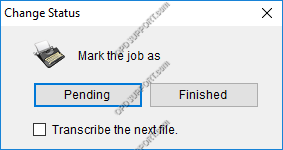
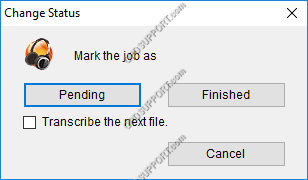
- If you close the Transcribe Bar you will be prompted to mark the file as Pending or Finished.
- If you intend to come back to the file later, then select Pending. The file will remain in the folder and will be marked transcription pending so when you return to the file it carries on where you left off.
- If the transcription is complete, then select Finished. The file will be marked transcription finished and will move to the Finished folder.
- If you don’t want to change anything then click Cancel. The file will be marked recording finished and will remain in the folder waiting to be transcribed.
Adjusting Personal Preferences
There are a number of personal preferences settings that you can configure in the Transcription Module such as auto-backspace and winding speed please follow the guides below.
Further information
If you want to know more about the Olympus software please take a look at the ODMS R6 GUI Overview.
If you want to know about how to use the Speech Recognition features please take a look at the guide here.
AS-2400
Quick Start Guide for AS-2400 Transcription Kit
This article goes through the basics of using your Olympus transcription kit.
Connecting the Foot Control
- Connect the foot switch cable to the USB adapter cable. Ensure you align the flat edges of the connector.

- Connect the USB adapter cable to the PC’s USB port.

- Place the foot control in a comfortable place under the desk ensuring the lead is not obstructing you.
Default Pedal Settings
Button assignment can be customised to your preference please follow the guide here
RS-28H/RS-28
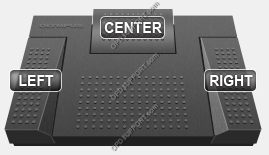
Left = Rewind
Center = Fast Forward
Right = Play
Connecting the Headset
- Plug the headset into the PC’s earphone socket. Do not place the headset to your ears until you have checked and reduced the computer volume.

Familiarising yourself with the Transcription Module
- Double click the Transcription Module icon on the desktop or select for all programs.
Transcription Module – Main Window
DSS Player Standard
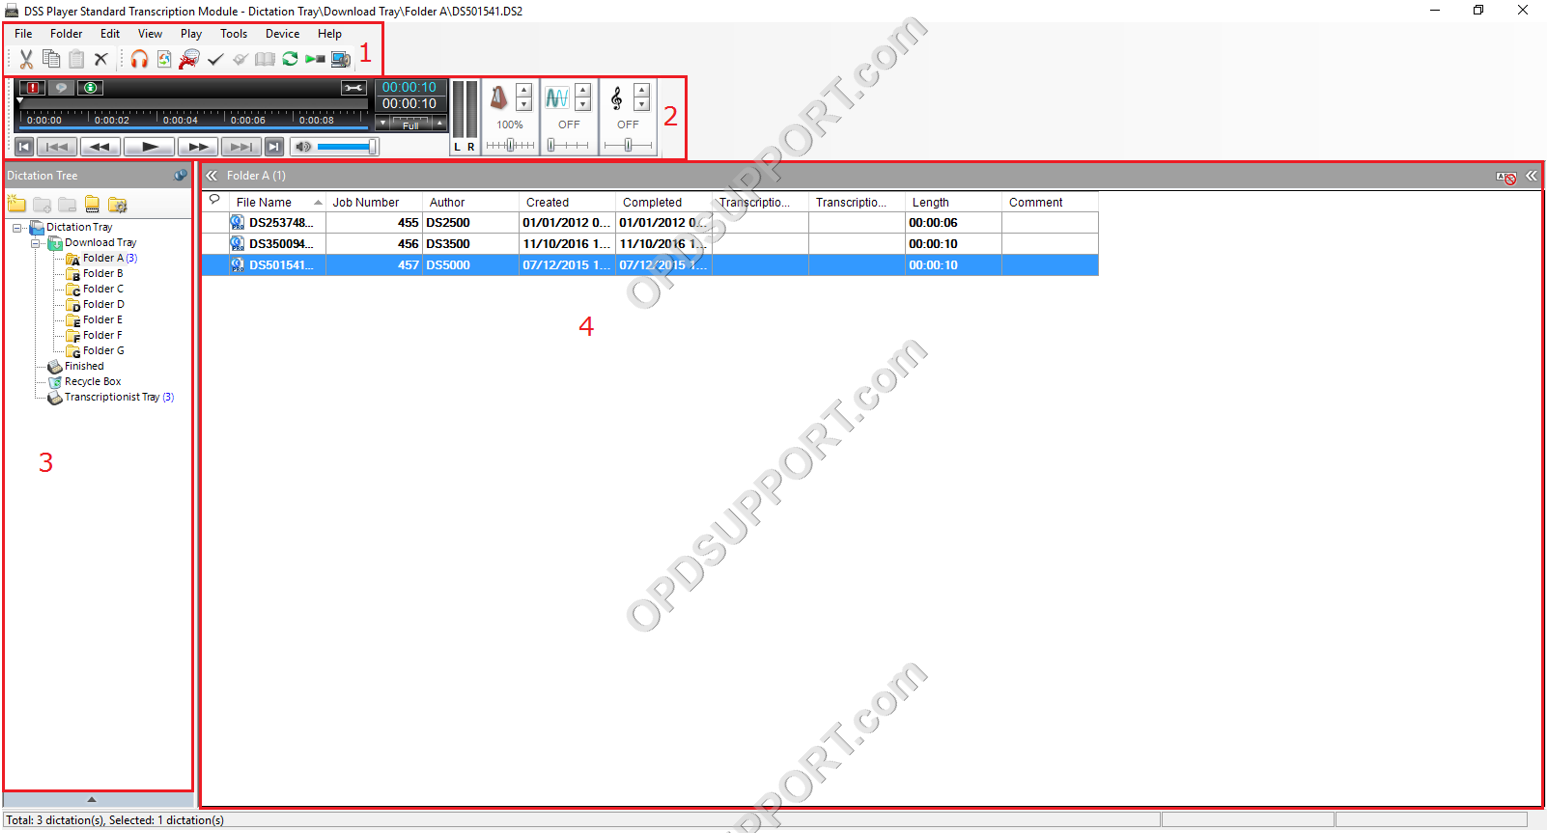
- Toolbar – Features common task buttons. Hover mouse to view description.
- Playback Window – Allows manual control of Play, Fast Forward and Rewind. Quickly set Volume, Tone, and playback speed settings.
- Dictation Tree View – List all folders. Select Transcription Tray for summary overview
- Content List View – Lists all the audio files for the selected folder. All high priority files remain at the top of the list and are highlighted in red
Receiving dictations
New dictation files will be delivered to you via the following methods which the software can be configured to automatically receive files:
Transcribing Your First File
- Double-click on the selected file.
- The main transcribe window will disappear and a small transcribe bar becomes visible.
- Press Play via the foot control to begin audio playback.

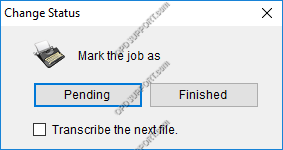
- If you close the Transcribe Bar you will be prompted to mark the file as Pending or Finished.
- If you intend to come back to the file later, then select Pending. The file will remain in the folder and will be marked transcription pending so when you return to the file it carries on where you left off.
- If the transcription is complete, then select Finished. The file will be marked transcription finished and will move to the Finished folder.
- If you don’t want to change anything then click Cancel. The file will be marked recording finished and will remain in the folder waiting to be transcribed.
Adjusting Personal Preferences
There are a number of personal preferences settings that you can configure in the Transcription Module such as auto-backspace and winding speed please follow the guides below.
Further information
If you want to know about the Olympus software please take a look at the DSS Player Standard Overview.
