“DS-9500/DS-9100/DS-9000/DS-2600/DS-2700”
This article goes through the basics of using your mobile recorder.
The images in this article may vary for each mobile recorder however the button layout and instructions are very much the same.
Insert the battery
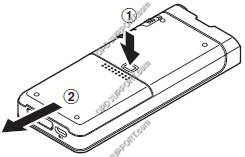
- Lightly press down on the battery cover release button, then open the battery cover.
- Insert the battery, observing orientation.
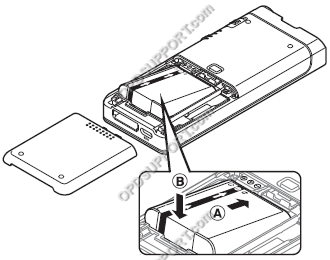
- Slide the cover back until it clicks into position.
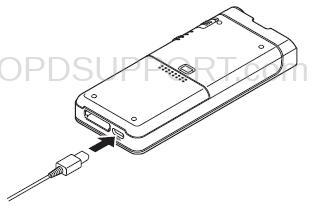
- Connect the USB cable to the recorder to charge the battery.
Connecting the Docking Station
The DS-9500 is supplied with the docking station. The DS-9000 and DS-2600 will have a USB cable to connect to the computer.
- Connect the smaller end of the USB lead to the back of the dock. Connect the larger end to the computer.
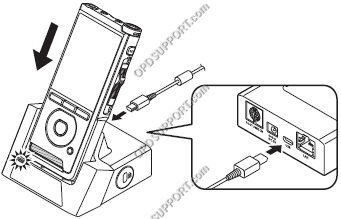
- Connect the power supply to the small round socket.
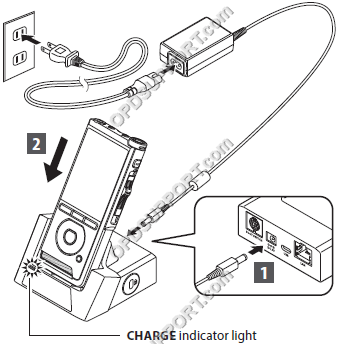
Getting Familiar with the Device
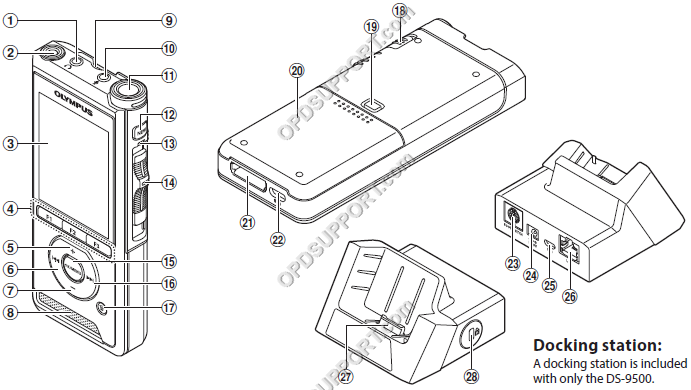
| 1 Earphone jack | 15 OK/MENU button |
| 2 Built-in 2nd microphone (L) | 16 Fast forward button |
| 3 Display | 17 Erase button |
| 4 Programmable smart (F1,F2,F3) buttons | 18 POWER (ON/OFF) switch |
| 5 + Volume button | 19 Battery cover release button |
| 6 Rewind button | 20 Battery cover |
| 7 – Volume button | 21 Docking station connector |
| 8 Built-in speaker | 22 USB connector |
| 9 SD card slot | 23 Foot switch connector |
| 10 Microphone jack | 24 AC adaptor jack |
| 11 Built-in main microphone (R) | 25 USB connector (micro-B) |
| 12 NEW button | 26 Ethernet cable connector (To use Ethernet, connect the bundled AC adaptor to CR21) |
| 13 LED Indicator light | 27 Connector |
| 14 Slide (REC/STOP/PLAY/REV) switch | 28 Security slot |
How to create a new dictation
- Power on the device.
- If there are any dictations already on the device, press the “NEW” button once the device loads to the main display to create a new dictation.
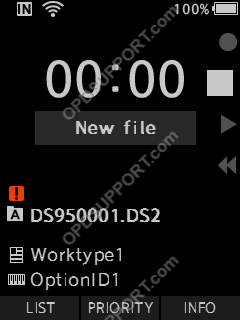
- Move the slide switch in to the “REC” position to begin recording. The LED will illuminate red.
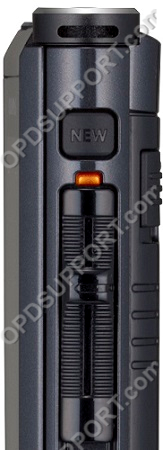
How to pause during a dictation
- Should you need to pause the current dictation, move the slide switch into the “STOP” position.
- When you are ready to resume the dictation, move the slide switch in to the “REC” position.
How to finish a dictation
- Move the slide switch to the “STOP” position. At this point, you can connect the device to the PC and download your dictations. Alternatively you can continue creating more dictations by pressing “NEW”.
How to review a dictation
- If you need to review a dictation, for example, if you have been interrupted by the telephone, move the slide switch in to the “STOP” position to stop dictating the current dictation
- Move the slide switch in to the “REV” position to review the dictation.
- Release the slide switch to go to the “PLAY” position when you have reviewed far enough in to the dictation.The dictation will automatically play back to the end.
How to navigate between dictations
- Press the “Rewind” button twice to go to the previous file or press the “Fast Forward” button twice to go to the next file.
Overwriting part of a dictation
- Press the “Fast Forward” or “Rewind” button to select the dictation you want to edit.
- Move and hold the slide switch to the “REV” position until you are at the point in the dictation which you want to overwrite.
- Move the slide switch in to the “STOP” position and confirm you are at the correct point in the recording.
- Move the slide switch in to the “REC” position to start overwriting the dictation.
- Move the slide switch in to the “STOP” position to stop overwriting the dictation.
How to erase files
- Please note when a file is erased it can’t be restored.
- Press the “Fast Forward” or “Rewind” button to select the file you want to erase.
- Press the “ERASE” button and press “+” to select File Erase.
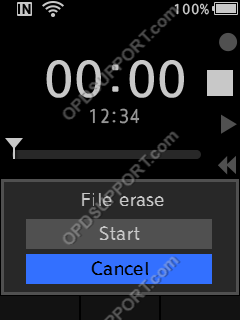
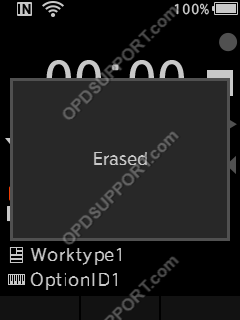
- Press “+” to select “Start” and then Press “OK/MENU” button. The display changes to Erase! and erasing will start and then will display Erase Done.
How to insert a recording
- Press the “Fast Forward” or “Rewind” button to select the dictation you want to edit.
- Move the slide switch to “REV” to review the recording.
- Release the slide switch to go to “PLAY” position when you are at the point you want to insert the recording.
- While its playing the file press the “F1” button to insert an additional recording. The display will show Insert Rec?
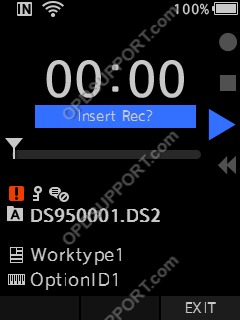
- Move the slide switch to the “REC” position to start inserting the additional recording. The display will show Insert Rec and the recording time.
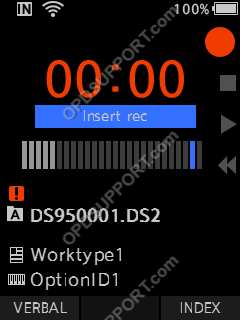
- Move the slide switch to the “STOP”position to stop inserting the additional recording.
- Then press “F3” to exit insert recording mode
Partial erase
- Move the slide switch to “REV” to review the recording
- Release the slide switch to go to “PLAY” position when you are at the point to erase
- While its playing press the “ERASE” button. The display will show Erase Start.
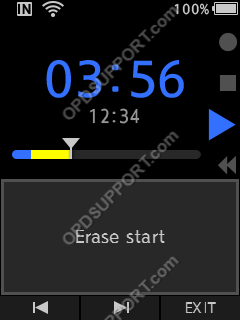
- The file will continue playing when you have reached the end point that you want to erase press “ERASE” to confirm.
- If you press the “F1” button, playback will skip back and restart from the partial erase starting point. Playback will continue until the end of the file or until the partial erase ending point is confirmed.
- If you press the “F2” button, playback will skip to the end of the file.
- The erase starting point time and the ending point time will be display will alternate for 8 seconds. To confirm the partial erase Press the “ERASE” button or if you wish to cancel it press “F3”.
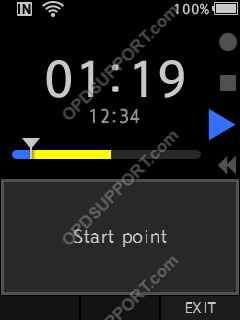
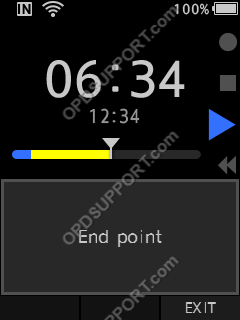
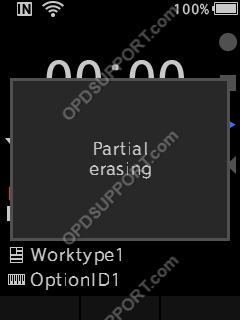
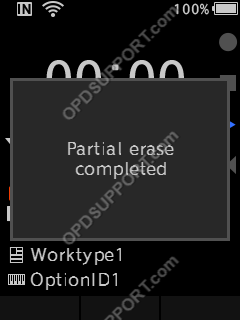
- If you start the partial erase the display changes to Partial erasing and then change to Partial erase completed.
Send your dictations
Once you have created your recordings you can send your recordings from the recorder or download the files into the software and send them via the following methods. If you are using the DS-9500/DS-9000 it will come with ODMS R7 software has automated functions which can be configured for a seamless workflow. If you have the DS-2600 it will come with the DSS Player Standard software.
ODMS R7
DSS Player Standard
Further information
If you want to know about the Olympus software please take a look at the ODMS R8/R7 GUI Overview and the DSS Player Standard Overview.
DS-7000/DS-5500/DS-5000
This article goes through the basics of using your mobile recorder.
The images in this article may vary for each mobile recorder however the button layout and instructions are very much the same.
Insert the battery
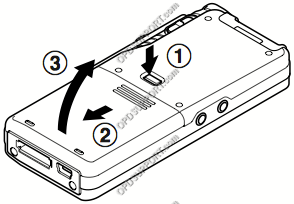
- Lightly press down on the battery cover release button, then open the battery cover.
- Insert the battery, observing orientation.
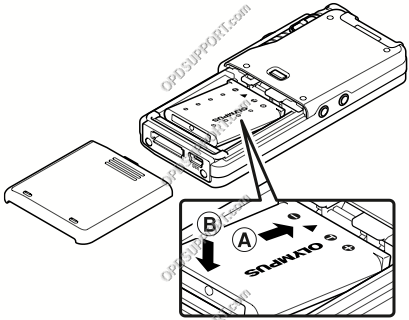
- Slide the cover back until it clicks into position.
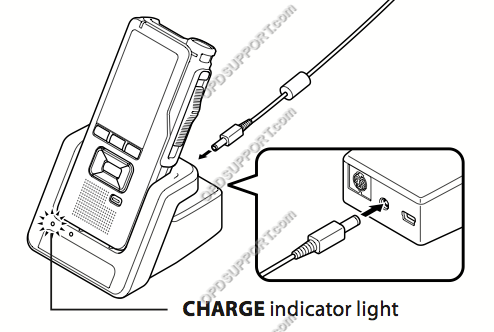
Connecting the Docking Station
The DS-7000 is supplied with the docking station however, the docking station is an optional item which can be purchased separately for other compatible recorders.
- Connect the smaller end of the USB lead to the back of the dock. Connect the larger end to the computer.
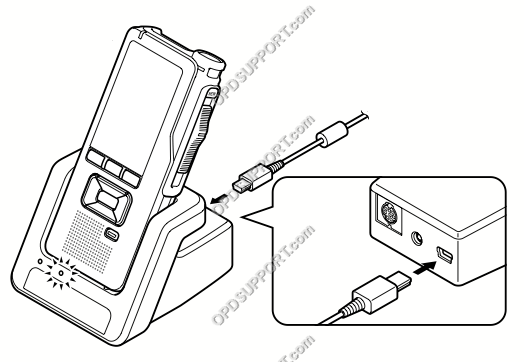
- Connect the power supply to the small round socket.
Getting Familiar with the Device
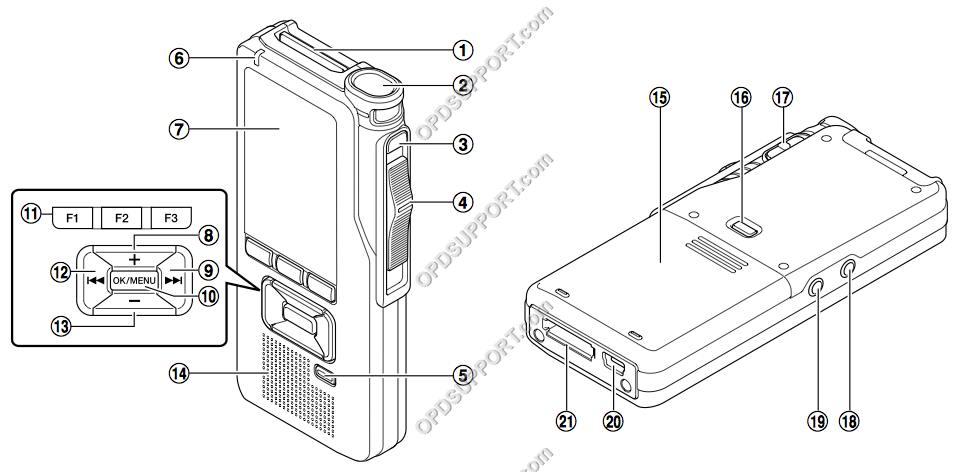
| 1 SD card slot | 12 Rewind button |
| 2 Microphone | 13 Volume – button |
| 3 NEW button | 14 Speaker |
| 4 Slide switch (REC / STOP / PLAY / REV) | 15 Battery cover |
| 5 ERASE button | 16 Battery cover release button |
| 6 Record indicator light | 17 POWER (ON/OFF) switch |
| 7 Display | 18 Earphone jack |
| 8 Volume + button | 19 Microphone jack |
| 9 Fast Forward | 20 USB connector |
| 10 OK / MENU button | 21 Docking station connector |
| 11 Function (F1,F2,F3) buttons |
How to create a new dictation
- Power on the device.
- If there are any dictations already on the device, press the “NEW” button once the device loads to the main display to create a new dictation.
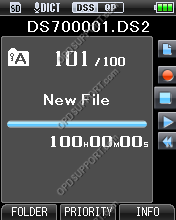
- Move the slide switch in to the “REC” position to begin recording. The LED will illuminate red.

How to pause during a dictation
- Should you need to pause the current dictation, move the slide switch into the “STOP” position.
- When you are ready to resume the dictation, move the slide switch in to the “REC” position.
How to finish a dictation
- Move the slide switch to the “STOP” position. At this point, you can connect the device to the PC and download your dictations. Alternatively you can continue creating more dictations by pressing “NEW”.
How to review a dictation
- If you need to review a dictation, for example, if you have been interrupted by the telephone, move the slide switch in to the “STOP” position to stop dictating the current dictation.
- Move the slide switch in to the “REV” position to review the dictation.
- Release the slide switch to go to the “PLAY” position when you have reviewed far enough in to the dictation. The dictation will automatically play back to the end.
How to navigate between dictations
- Press the “Rewind” button twice to go to the previous file or press the “Fast Forward” button twice to go to the next file.
Overwriting part of a dictation
- Press the “Fast Forward” or “Rewind” button to select the dictation you want to edit.
- Move and hold the slide switch to the “REV” position until you are at the point in the dictation which you want to overwrite.
- Move the slide switch in to the “STOP” position and confirm you are at the correct point in the recording.
- Move the slide switch in to the “REC” position to start overwriting the dictation.
- Move the slide switch in to the “STOP” position to stop overwriting the dictation.
How to erase files
Please note when a file is erased it can’t be restored.
- Press the “Fast Forward” or “Rewind” button to select the file you want to erase.
- Press the “ERASE” button and press “+” to select File Erase. Erase in Folder means all files in the folder will be erased.
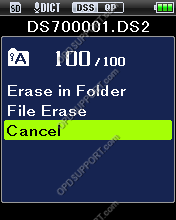
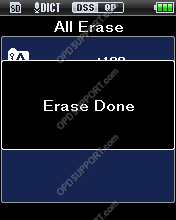
- Press “+” to select “Start” and then Press “OK/MENU” button. The display changes to Erase! and erasing will start and then will display Erase Done.
How to insert a recording
- Press the “Fast Forward” or “Rewind” button to select the dictation you want to edit
- Move the slide switch to “REV” to review the recording
- Release the slide switch to go to “PLAY” position when you are at the point you want to insert the recording.
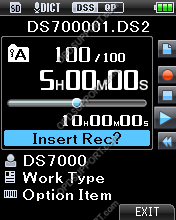
- While its playing the file press the “F1” button to insert an additional recording. The display will show Insert Rec?
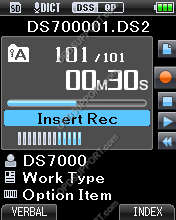
- Move the slide switch to the “REC” position to start inserting the additional recording. The display will show Insert Rec and the recording time
- Move the slide switch to the “STOP”position to stop inserting the additional recording.
- Then press “F3” to exit insert recording mode
Partial erase
- Move the slide switch to “REV” to review the recording
- Release the slide switch to go to “PLAY” position when you are at the point to erase
- While its playing press the “ERASE” button. The display will show Erase Start.
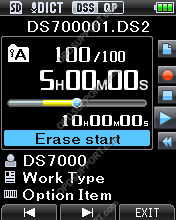
- The file will continue playing when you have reached the end point that you want to erase press “ERASE” to confirm.
- If you press the “F1” button, playback will skip back and restart from the partial erase starting point. Playback will continue until the end of the file or until the partial erase ending point is confirmed.
- If you press the “F2” button, playback will skip to the end of the file.
- The erase starting point time and the ending point time will be display will alternate for 8 seconds. To confirm the partial erase Press the “ERASE” button or if you wish to cancel it press “F3”.
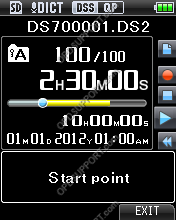
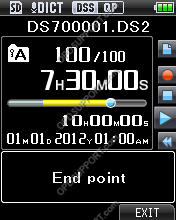
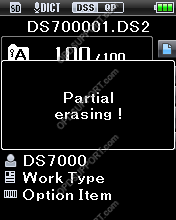
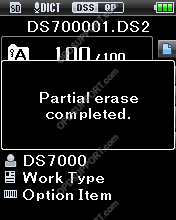
- If you start the partial erase the display changes to Partial erasing and then change to Partial erase completed.
Send your dictations
Once you have created your recordings you can download your recordings and send them via the following methods. The ODMS software has automated functions which can be configured for a seamless workflow however, Standard is the basic software so it doesn’t offer as much automated functions.
- Network Folder share (For ODMS users follow this guide here and for Standard users follow this guide here)
- Email (For ODMS users follow this guide here and for Standard users follow this guide here)
- FTP (For ODMS users follow this guide here)
- Background speech recognition (For ODMS users follow this guide here)
Further information
If you want to know about the Olympus software please take a look at the ODMS R6 GUI Overview and the DSS Player Standard R2 Overview
DS-3500/DS-3400,DS-2500,DS-2400
This article goes through the basics of using your mobile recorder.
The images in this article may vary for each mobile recorder however the button layout and instructions are very much the same.
Insert the battery
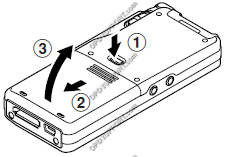
- Lightly press down on the battery cover release button, then open the battery cover.
- Insert the battery, observing orientation.
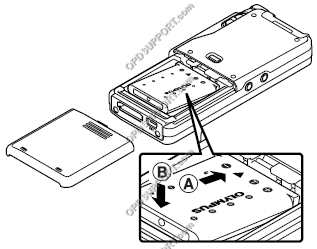
- Slide the cover back until it clicks into position.
Getting Familiar with the Device
DS-3500 Recorder
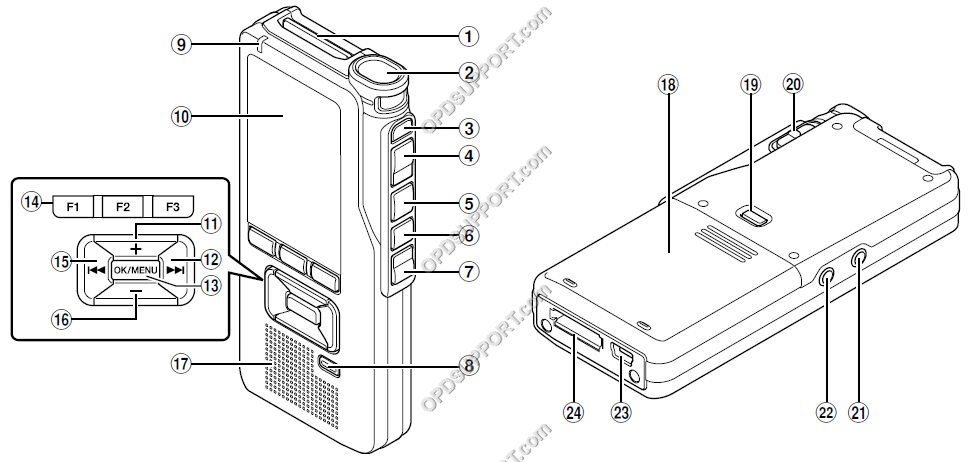
| 1 SD card slot | 13 OK / MENU button |
| 2 Microphone | 14 Function (F1,F2,F3) buttons |
| 3 NEW button | 15 Rewind button |
| 4 REC button |
16 Volume – button |
| 5 STOP button |
17 Speaker |
| 6 PLAY button |
18 Battery cover |
| 7 REV button |
19 Battery cover release button |
| 8 ERASE button | 20 POWER (Power/Hold) switch |
| 9 Record indicator light | 21 Earphone jack |
| 10 Display | 22 Microphone jack |
| 11 Volume + button | 23 USB connector |
| 12 Fast Forward | 24 Docking station connector |
DS-2500/DS-2400 Recorder
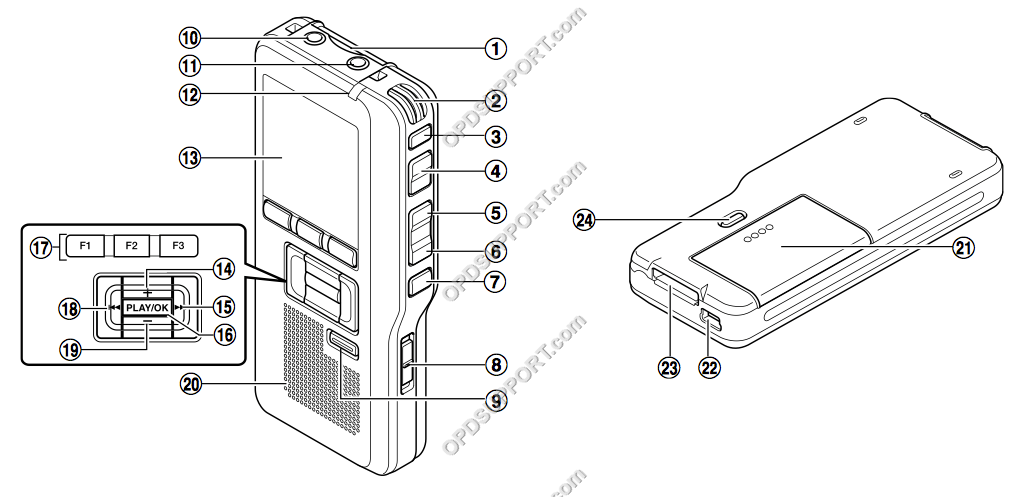
| 1 SD card slot | 13 Display |
| 2 Microphone | 14 Volume + button |
| 3 NEW button | 15 Fast Forward button |
| 4 REC button |
16 PLAY / OK button |
| 5 REW button |
17 Smart (F1, F2, F3) buttons |
| 6 FF button |
18 Rewind button |
| 7 STOP button |
19 Volume – button |
| 8 Power / Hold switch |
20 Speaker |
| 9 Erase button |
21 Battery cover |
| 10 Earphone jack |
22 USB connector |
| 11 Microphone jack |
23 Docking station connector |
| 12 Record Indicator |
24 Battery cover release button |
How to create a new dictation
- Power on the device.
- If there are any dictations already on the device, press the “NEW” button once the device loads to the main display to create a new dictation.

- Push the “REC” button to begin recording. The LED will illuminate red.

How to pause during a dictation
- Should you need to pause the current dictation, press the “STOP” or “REC” button
- When you are ready to resume the dictation, press the “REC” button.
How to finish a dictation
- Press the “STOP” button. At this point, you can connect the device to the PC and download your dictations. Alternatively you can continue creating more dictations by pressing “NEW”.
How to review a dictation
- If you need to review a dictation, for example, if you have been interrupted by the telephone, Press the “STOP” button to stop dictating the current dictation.
- Press and hold down the “REV”/”REW” button to review the dictation.
- Let go of the “REV”/”REW” button to play the file.
How to navigate between dictations
- Press the “Rewind” button twice to go to the previous file or press the “Fast Forward” button twice to go to the next file.
Overwriting part of a dictation
- Press the “Fast Forward” or “Rewind” button to select the dictation you want to edit.
- Press and hold the “REV”/”REW” button until you are at the point in the dictation which you want to overwrite.
- Press the “STOP” button and confirm you are at the correct point in the recording.
- Press the “REC” position to start overwriting the dictation.
- Press the “STOP” position to stop overwriting the dictation.
How to erase files
Please note when a file is erased it can’t be restored.
- Press the “Fast Forward” or “Rewind” button to select the file you want to erase.
- Press the “ERASE” button and press “+” to select File Erase. Erase in Folder means all files in the folder will be erased.

- Press “+” to select “Start” and then Press “OK/MENU” button. The display changes to Erase! and erasing will start and then will display Erase Done.

How to insert a recording
- Press the “Fast Forward” or “Rewind” button to select the dictation you want to edit
- Press and hold the “REV”/”REW” button to review the recording
- Let go of the “REV”/”REW” button when you are at the point you want to insert the recording.
- While its playing the file press the “F1” button to insert an additional recording. The display will show Insert Rec?

- Press the “REC” position to start inserting the additional recording. The display will show Insert Rec and the recording time

- Press the “STOP” position to stop inserting the additional recording.
- Then press “F3” to exit insert recording mode
Partial erase
- Press and hold down the “REV”/”REW” button to review the recording
- Release the “REV”/”REW” button when you are at the point to erase
- While its playing press the “ERASE” button. The display will show Erase Start.

- The file will continue playing when you have reached the end point that you want to erase press “ERASE” to confirm.
- If you press the “F1” button, playback will skip back and restart from the partial erase starting point. Playback will continue until the end of the file or until the partial erase ending point is confirmed.
- If you press the “F2” button, playback will skip to the end of the file.
- The erase starting point time and the ending point time will be display will alternate for 8 seconds. To confirm the partial erase Press the “ERASE” button or if you wish to cancel it press “F3”.


- If you start the partial erase the display changes to Partial erasing and then change to Partial erase completed.


Send your dictations
Once you have created your recordings you can download your recordings and send them via the following methods. The ODMS software has automated functions which can be configured for a seamless workflow however, Standard is the basic software so it doesn’t offer as much automated functions.
- Network Folder share (For ODMS users follow this guide here and for Standard users follow this guide here)
- Email (For ODMS users follow this guide here and for Standard users follow this guide here)
- FTP (For ODMS users follow this guide here)
- Background speech recognition (For ODMS users follow this guide here)
Further information
If you want to know about the Olympus software please take a look at the ODMS R8/R7 GUI overview, ODMS R6 GUI Overview and the DSS Player Standard Overview.
If you are using ODMS and want to know about how to use the Speech Recognition features please take a look at the guide here.
