This document will detail the overview of the Graphical User Interface of the Olympus (R6) ODMS Dictation and Transcription Module software and explain what each button and section is for.
Dictation Module
Overview
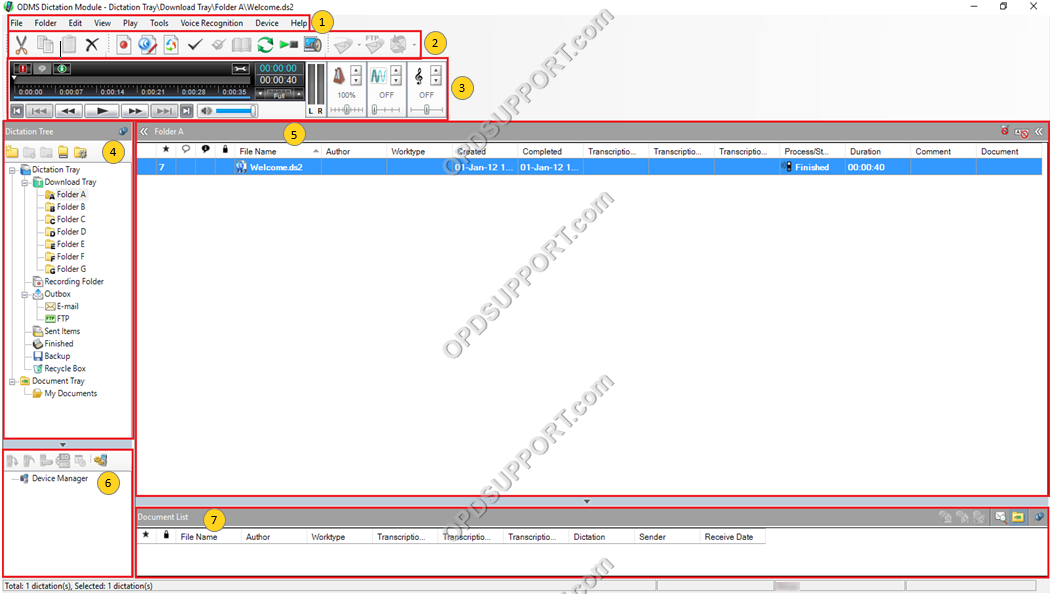
Contents
- Drop-down Menus
- Toolbars
- Playback Control Panel
- Dictation Tree
- Content List View
- Device Manager
- Document List
File
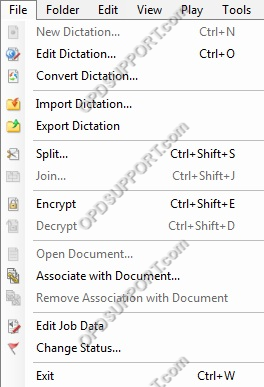
| Menu | Function |
| New Dictation | Record a new dictation. |
| Edit Dictation | Edit a current dictation. |
| Convert Dictation | Convert an audio file to a different audio format. |
| Import Dictation | Copy or move an audio file from another folder into ODMS. |
| Export Dictation | Copy or move an audio file from ODMS to another folder. |
| Split | Split an audio file into two or more separate audio files. |
| Join | Merge two or more audio files into one. |
| Encrypt | Apply a password to an audio file. |
| Decrypt | Remove password protection from an encrypted audio file. |
| Open Document | Open the selected document in a word processor. |
| Associate with Document | Link an audio file to a document. |
| Remove Association with Document | Remove link between an audio file & a document. |
| Edit Job Data | Customise the job data (Author, Worktype, Comment) for a selected file. |
| Change Status | Change the Status of a selected audio file. |
| Exit | Closes the ODMS application. |
Folder
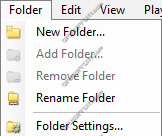
| Menu | Function |
| New Folder | Creates a new Folder within the Download Tray. |
| Add Folder | Adds an existing folder under the Download Tray and pre-sets the folder path. |
| Remove Folder | Deletes the selected folder if created by the user. |
| Rename Folder | Allows renaming of the selected folder. |
| Folder Settings | Opens the “Folder Design” tab within the “Options” menu. |
Edit
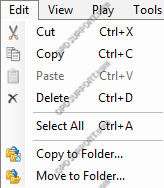
| Menu | Function |
| Cut | Much like the “Copy” feature, copies the audio file to the “Clipboard”, ready to be pasted to another location/folder. But does not keep the original file. |
| Copy | Copies a file to the “Clipboard”, ready to be pasted to another location, keeping the original audio file in the original location. |
| Paste | Inputs the contents of the “Clipboard” to the selected folder. |
| Delete | Deleted the selected audio file. |
| Select All | Selects all contents of the selected folder. |
| Copy to Folder | Creates a copy of the selected audio file and places the copy in the chosen location. Leaving the original file in the original folder. |
| Move to Folder | Moves a selected audio file to the chosen folder. |
View
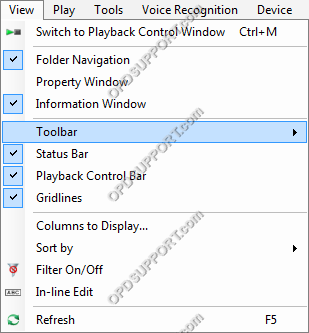
| Menu | Function |
| Switch to Playback Control Window | Changes the view of the ODMS software so only the “Playback Control Window” is displayed. |
| Folder Navigation | Displays the “Folder Navigation Window”, containing the audio folders, which contain all audio files downloaded/imported into the ODMS software. |
| Property Window | Displays the “Property Window” at the right hand-side of the software detailing the information on the selected folder or audio file. |
| Information Window | Displays the “Information Window” at the bottom of the software, which lists all audio files set for “Voice Recognition” and “Adaptation”, as well as “Mail preview” and “Document List”. |
| Toolbar: Standard | Displays the “Standard” toolbar. |
| Toolbar: Edit | Displays the “Edit” toolbar. |
| Toolbar: E-mail / FTP | Displays the “E-mail / FTP” toolbar. |
| Toolbar: Voice Recognition | Displays the “Voice Recognition” toolbar. |
| Status Bar | Displays this bar, at the bottom of the software, detailing how many audio files are in the selected folder and if sending/receive audio files – this will display the status on this bar. |
| Playback Control Bar | Displays the “Playback Control Bar” at the top of the software, allowing playback options for the selected audio file, without having to switch to the “Playback Control Window”. |
| Gridlines | Displays the grid lines within the “Contents List” to emphasize the rows and columns. |
| Columns to Display | Displays a prompt used to configure what column are shown and which are not within the ODMS software. |
| Sort by | This option sorts audio files within the selected folder dependant upon the selected attribute. |
| Filter On/Off | Displays the “Filter” icons for each column, this can be configured to show only audio files that meet the set criteria. |
| In-Line Edit | Displays the “In-Line Edit” icon, so the name of audio files can be changed. |
| Refresh | Refreshes the ODMS software, forcing it to check the folders, ensuring the user can view all audio files in the Olympus folders. |
Play
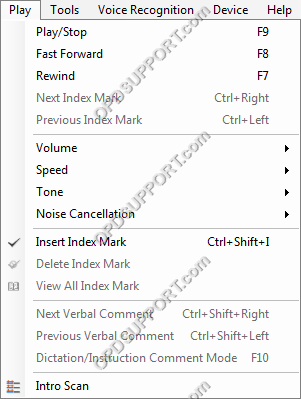
| Menu | Function |
| Play/Stop | Starts playing back the selected audio file. |
| Fast Forward | Fast forwards into the selected audio file. |
| Rewind | Rewinds into the selected audio file. |
| Next Index Mark | Skips to the next index mark within the selected audio file. |
| Previous Index Mark | Skips back to the previous index mark within the selected audio file. |
| Volume | Raise or lower the volume of playback. |
| Speed | Raise or lower the speed of playback. |
| Tone | Raise or lower the tone of the audio playback. |
| Noise Cancellation | Choose between 3 levels of Noise Cancellation. |
| Insert Index Mark | Places an index mark within the selected file at the current point in the audio file. |
| Delete Index Mark | Deletes the currently selected index mark, within the selected audio file. |
| View All Index Mark | Displays a prompt that lists all index marks and at what point within the selected audio file each mark is set. |
| Next Verbal Comment | Skips to the next verbal comment within the selected audio file. |
| Previous Verbal Comment | Skips back to the previous verbal comment within the selected audio file. |
| Dictation/Instruction Comment Mode | Switches between playback of the selected audio file and the Instruction Comment. |
| Intro Scan | Plays back the first 5 seconds of each audio file going down the list starting on the selected audio file. |
Tools
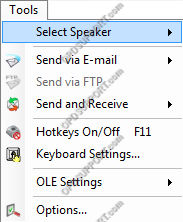
| Menu | Function |
| Select Speaker | Scrolls through the audio devices connected to the PC. |
| Send via E-mail | E-mail selected audio file using profiles setup within the ODMS software. |
| Send via FTP | Sends audio file via FTP using profiles setup within the ODMS software. |
| Send and Receive | Will check whether or not any new audio files have been received via E-mail/FTP. |
| Hotkeys On/Off | This option enables the “Hotkeys” functions within the ODMS software. |
| Keyboard Settings | Configure the “Hotkeys” and their functions here. |
| OLE Settings: Linked | A file linked with audio data retains the file name and path of the dictation File, resulting in a smaller amount of data. The file may not be able to be played if it cannot refer to the audio data path. |
| OLE Settings: Embedded | An embedded object brings all audio data into the file, resulting in a larger amount of data. The file with audio data embedded can be played on another PC that has DSS Player installed. |
| Options | Opens the options settings, containing all the configuration details for the ODMS software. |
Voice Recognition
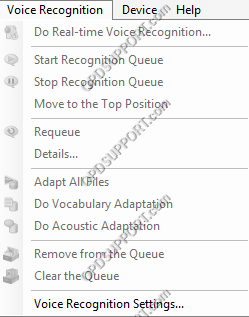
| Menu | Function |
| Do Real-time Voice Recognition | Opens the Real-time voice recognition window, this is used to actively transcribe what the audio says. |
| Start Recognition Queue | Will begin voice recognition of audio files that have been queued for “Voice Recognition”. Transcribing dictations in the background whilst still allowing use of the ODMS software. |
| Stop Recognition Queue | Will halt all voice recognition of audio files queued for “Voice Recognition”. |
| Move to the Top Position | This will move an audio file in the “Voice Recognition Waiting List” to the top of the list, so when the voice recognition queue is started, this dictation will be processed first. |
| Requeue | When an audio file has gone through the voice recognition process, it will appear in the “Voice Recognition Result List”, from there, using this option it can be requeued to re-transcribe the audio file. |
| Details | This option opens the details of the selected audio file in the “Voice Recognition Result List”, such as whether or not voice recognition was successful or if there was an error. |
| Adapt All Files | Any audio files set for adaptation will start to go through the adaptation process, essentially training the DNS profile. |
| Do Vocabulary Adaptation | This will perform the “Vocabulary Adaptation” of an audio file within the “Adaptation Waiting List”, primarily adapting the DNS profile to the vocabulary of the user. |
| Do Acoustic Adaptation | This will perform the “Acoustic Adaptation” of an audio file within the “Adaptation Waiting List”, primarily adapting the DNS profile to the acoustics of the user. |
| Remove from the Queue | Removes the selected audio file from the relevant queue. |
| Clear the Queue | Removes all audio files from the queue. |
| Voice Recognition Settings | Opens the option settings for voice recognition, where all configuration settings for voice recognition are stored. |
Device
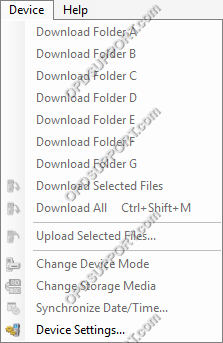
| Menu | Function |
| Download Folder A-G | Downloads files from the connected device to the PC. |
| Download Selected Files | Downloads selected files into the ODMS software. To select multiple files, select an audio file then hold “Ctrl” and select other audio files to be downloaded. |
| Download All | Downloads all files from the connected device into the Olympus software. |
| Upload Selected Files | Uploads selected files into the connected device. To select multiple files, select an audio file then hold “Ctrl” and select other audio files to be downloaded. |
| Change Device Mode: Composite | Whilst in “Composite” mode, the device is recognised as three devices, a “Storage” device, an “Input” device and an “Output” device. |
| Change Device Mode: Storage | Whilst in “Storage” mode, the device is recognised only as a “Storage” device, allowing access to the audio files on the memory card(s). |
| Change Storage Media | Changes the active memory currently being accessed, between the primary “SD Memory Card” and the secondary “MicroSD memory card”. |
| Synchronize Date/Time | Changes the Date/Time on the device to match the set Date/Time of the PC the device is connected to. |
| Device Settings | Opens the “Device” tab in the option menu settings, all settings that apply to the device can be configured here. |
Help
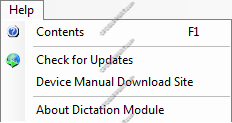
| Menu | Function |
| Contents | Displays a dialogue that contains detailed information on the ODMS software. |
| Check for Updates | Checks the Olympus update server for the latest version of software, if the user is already on the latest version it will not update the software, if the user can update, this will prompt the user to see whether or not they want to update the software or not. |
| Device Manual Download Site | Opens the Olympus “Downloads” web page in the default web browser. |
| About Dictation Module | Opens a dialogue detailing the User ID, Company Name, License key (used to install the software) & version of the ODMS software currently installed. |
The following will explain the components within the Playback Control panel. Please follow the below descriptions from left to right on the picture.

1 Playback Controls: Skip to Start > Previous “Index Mark” > Rewind.
2 Playback Controls: Play/Pause.
3 Playback Controls: Fast forward > Next “Index Mark” > Skip to end.
4 Volume Control: This control is used to change the playback volume of an audio file.
A Playback Control Bar: This bar shows where in the audio file a user is, where index marks are within the audio file and shows the full length of an audio file.
1 Priority: This sets priority on an audio file, making the audio file appear at the top of the content list.
2 Instruction Comment: This switches to the Instruction Comment playback bar, allowing playback of an Instruction Comment attached to an audio file.
3 Information: This displays the information of an audio file, such as File Name, Size, Duration, File format, Audio format, whether it has an Instruction Comment or not and whether the file is encrypted or locked.
4 Settings: This displays the Playback Control configuration settings in the options menu under the “User Settings” tab allowing the configuration of the Playback Control panel.
5 Volume Level Meter: This displays the levels at which the microphone registers user input.
B Audio Control options: These options change the way audio files are played back (speed, tone & noise cancellation).
5 Playback Speed: This controls the speed at which the audio file is played back.
6 Noise Cancellation: There are 3 levels of “Noise Cancellation”, this feature removes background noise from the audio playback.
7 Tone Control: This controls the “Tone” of the dictation while playing an audio file back.
This section details how to customise the Folder’s and Folder Settings.
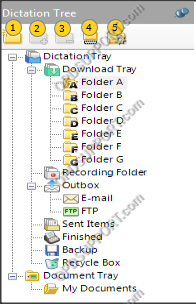
1 New Folder: This creates a “New Folder” / “Sub Folder” for audio files to be stored in. Via this feature, you can setup a folder structure to support your specific needs, for more information on creating folder structure click here
2 Add Folder: Using this feature, an additional folder can be added into the ODMS software to be used for storage of audio files.
3 Remove Folder: Using this feature, a folder can be removed/deleted from the ODMS software. Additionally, to remove a folder, you can manually delete it from the location within Windows by browsing to the parent folder via Windows Explorer, then deleting the folder.
4 Rename Folder: A folder can be renamed using this feature.
5 Folder Settings: This opens the “Folder Design” settings within the ODMS option settings, these settings control the configuration details of all folder attributes.
This displays the contents of the selected folder within the “Dictation Tree” or a selected folder within a devices “Voice Folders”, as demonstrated below, within “Typing PoolDepartment 1” there is an audio file named “Test_File1.ds2”.

Audio files are presented in alphabetical order via the File Name, Author, Worktype and other attributes. The audio files can also be filtered via Author ID(s), Worktype(s), duration, date created and more, using the “Filter” feature and enabling the renaming of audio files via the “In-line Edit” feature.
Also, if open, the “Properties Window” will display the details on an audio file or one of the folders within the “Dictation Tray”. To open the “Properties Window”, click on the “<<” button, or click on “View” > “Property Window”.
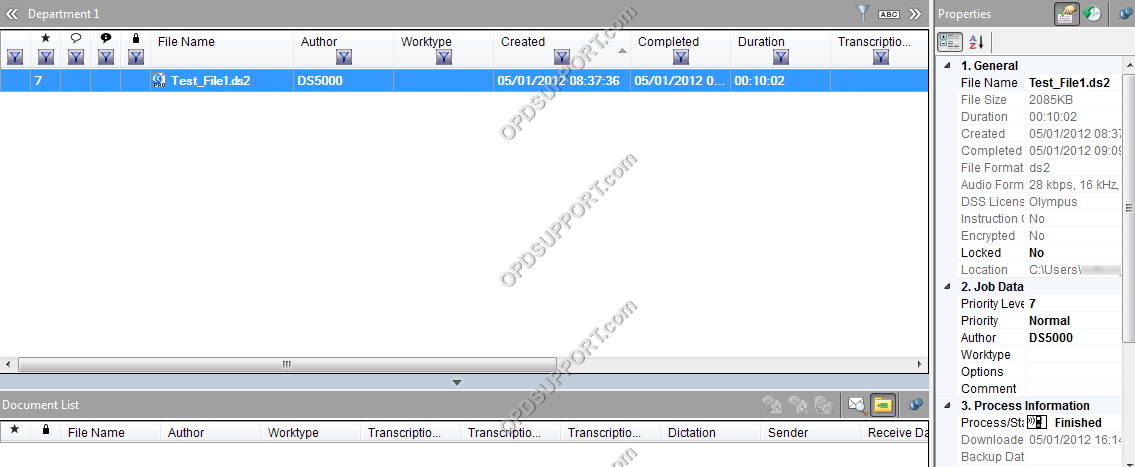
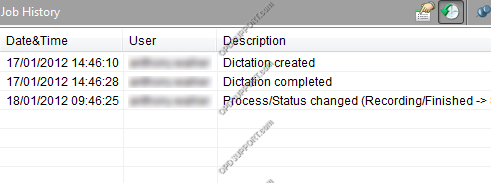
Also in the properties panel, the “Job History” can be displayed, this will detail what actions have been carried out within the ODMS software and what time they were performed.
The device manager section contains options and features pertaining to the currently connected device. From this section it is possible to download from, upload to and configure a device.
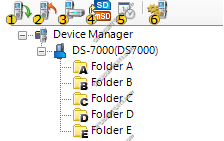
1 Download: Downloads all files from the device, into the relevant folder(s) within the ODMS software.
2 Upload: This option uploads the selected file(s) stored on the PC within the ODMS software to the currently connected device.
3 Change Device Mode: Changes the device mode between “Composite” & “Storage”…
4 Change Storage Media: Changes the selected memory within the device, between the SD & MicroSD card’s within the connected device.
5 Synchronise Date/Time: Synchronizes the Date/Time on the device with the Date/Time set on the PC the device is connected to.
6 Device Settings: This option opens the “Device” tab within the ODMS software, here all the settings to do with devices can be configured.
The document list displays all document files that have been associated with a dictation or transcribed using “Voice Recognition”. It also shows files that have been sent for “Adaptation” to improve voice recognition accuracy.

1 Voice Recognition Waiting List: This displays all audio files that have been set to be transcribed via the Dragon Naturally Speaking software.
2 Voice Recognition Result List: This displays the results of audio files that were set for Voice Recognition and that have finished being transcribed by the Dragon Naturally Speaking software.
3 Adaptation List: This displays audio files that have been set for Adaptation. Adaptation is where an audio file is taken by the Dragon Naturally Speaking software and used to train the profile, without the interaction of a user.
4 Mail Preview: This shows a preview of the e-mail to which the selected audio file or document was attached.
5 Document List View: This enables the option to show associated documents and documents that have been transcribed via voice recognition.
Transcription Module
Overview
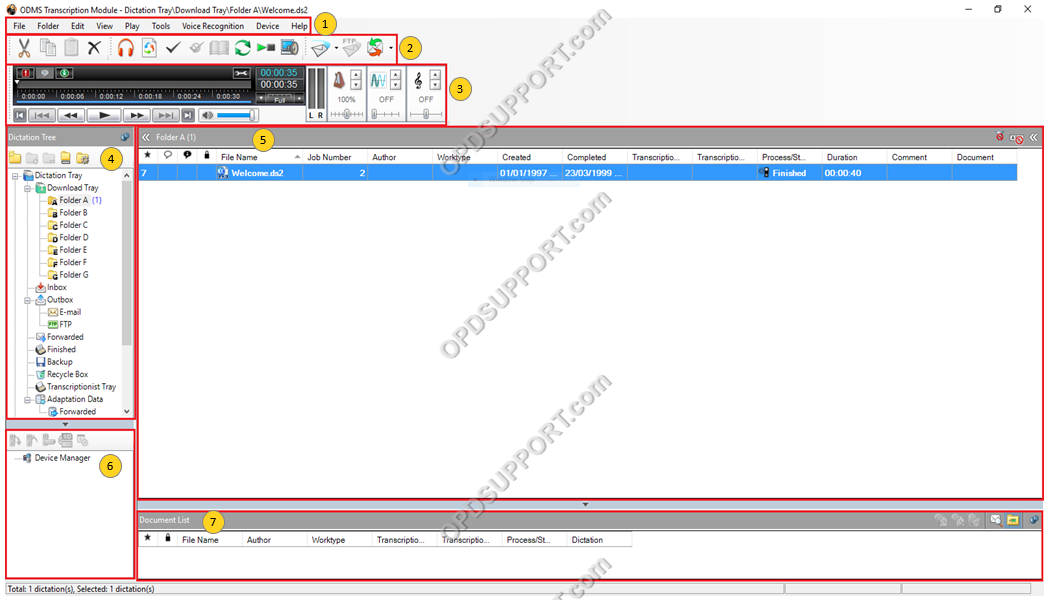
Contents
- Drop-down Menus
- Toolbars
- Playback Control Panel
- Dictation Tree
- Content List View
- Device Manager
- Document List
File
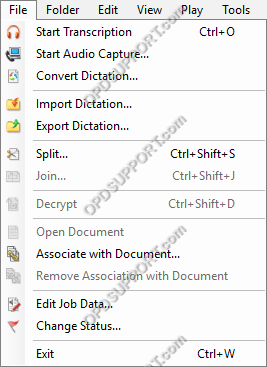
| Menu | Function |
| Start Transcription | Start transcribing the selected audio file |
| Start Audio Capture | Allows you to create a recording |
| Convert Dictation | Convert an audio file to a different audio format. |
| Import Dictation | Copy or move an audio file from another folder into ODMS. |
| Export Dictation | Copy or move an audio file from ODMS to another folder. |
| Split | Split an audio file into two or more separate audio files. |
| Join | Merge two or more audio files into one. |
| Encrypt | Apply a password to an audio file. |
| Decrypt | Remove password protection from an encrypted audio file. |
| Open Document | Open the selected document in a word processor. |
| Associate with Document | Link an audio file to a document. |
| Remove Association with Document | Remove link between an audio file & a document. |
| Edit Job Data | Customise the job data (Author, Worktype, Comment) for a selected file. |
| Change Status | Change the Status of a selected audio file. |
| Exit | Closes the ODMS application. |
Folder

| Menu | Function |
| New Folder | Creates a new Folder within the Download Tray. |
| Add Folder | Adds an existing folder under the Download Tray and pre-sets the folder path. |
| Remove Folder | Deletes the selected folder if created by the user. |
| Rename Folder | Allows renaming of the selected folder. |
| Folder Settings | Opens the “Folder Design” tab within the “Options” menu. |
Edit

| Menu | Function |
| Cut | Much like the “Copy” feature, copies the audio file to the “Clipboard”, ready to be pasted to another location/folder. But does not keep the original file. |
| Copy | Copies a file to the “Clipboard”, ready to be pasted to another location, keeping the original audio file in the original location. |
| Paste | Inputs the contents of the “Clipboard” to the selected folder. |
| Delete | Deleted the selected audio file. |
| Select All | Selects all contents of the selected folder. |
| Copy to Folder | Creates a copy of the selected audio file and places the copy in the chosen location. Leaving the original file in the original folder. |
| Move to Folder | Moves a selected audio file to the chosen folder. |
View

| Menu | Function |
| Switch to Playback Control Window | Changes the view of the ODMS software so only the “Playback Control Window” is displayed. |
| Folder Navigation | Displays the “Folder Navigation Window”, containing the audio folders, which contain all audio files downloaded/imported into the ODMS software. |
| Property Window | Displays the “Property Window” at the right hand-side of the software detailing the information on the selected folder or audio file. |
| Information Window | Displays the “Information Window” at the bottom of the software, which lists all audio files set for “Voice Recognition” and “Adaptation”, as well as “Mail preview” and “Document List”. |
| Toolbar: Standard | Displays the “Standard” toolbar. |
| Toolbar: Edit | Displays the “Edit” toolbar. |
| Toolbar: E-mail / FTP | Displays the “E-mail / FTP” toolbar. |
| Toolbar: Voice Recognition | Displays the “Voice Recognition” toolbar. |
| Status Bar | Displays this bar, at the bottom of the software, detailing how many audio files are in the selected folder and if sending/receive audio files – this will display the status on this bar. |
| Playback Control Bar | Displays the “Playback Control Bar” at the top of the software, allowing playback options for the selected audio file, without having to switch to the “Playback Control Window”. |
| Gridlines | Displays the grid lines within the “Contents List” to emphasize the rows and columns. |
| Columns to Display | Displays a prompt used to configure what column are shown and which are not within the ODMS software. |
| Sort by | This option sorts audio files within the selected folder dependant upon the selected attribute. |
| Filter On/Off | Displays the “Filter” icons for each column, this can be configured to show only audio files that meet the set criteria. |
| In-Line Edit | Displays the “In-Line Edit” icon, so the name of audio files can be changed. |
| Refresh | Refreshes the ODMS software, forcing it to check the folders, ensuring the user can view all audio files in the Olympus folders. |
Play
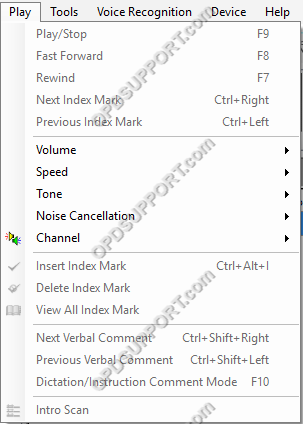
| Menu | Function |
| Play/Stop | Starts playing back the selected audio file. |
| Fast Forward | Fast forwards into the selected audio file. |
| Rewind | Rewinds into the selected audio file. |
| Next Index Mark | Skips to the next index mark within the selected audio file. |
| Previous Index Mark | Skips back to the previous index mark within the selected audio file. |
| Volume | Raise or lower the volume of playback. |
| Speed | Raise or lower the speed of playback. |
| Tone | Raise or lower the tone of the audio playback. |
| Noise Cancellation | Choose between 3 levels of Noise Cancellation. |
| Channel | Choose between 4 channels to play audio |
| Insert Index Mark | Places an index mark within the selected file at the current point in the audio file. |
| Delete Index Mark | Deletes the currently selected index mark, within the selected audio file. |
| View All Index Mark | Displays a prompt that lists all index marks and at what point within the selected audio file each mark is set. |
| Next Verbal Comment | Skips to the next verbal comment within the selected audio file. |
| Previous Verbal Comment | Skips back to the previous verbal comment within the selected audio file. |
| Dictation/Instruction Comment Mode | Switches between playback of the selected audio file and the Instruction Comment. |
| Intro Scan | Plays back the first 5 seconds of each audio file going down the list starting on the selected audio file. |
Tools

| Menu | Function |
| Select Speaker | Scrolls through the audio devices connected to the PC. |
| Send via E-mail | E-mail selected audio file using profiles setup within the ODMS software. |
| Send via FTP | Sends audio file via FTP using profiles setup within the ODMS software. |
| Send and Receive | Will check whether or not any new audio files have been received via E-mail/FTP. |
| Hotkeys On/Off | This option enables the “Hotkeys” functions within the ODMS software. |
| Keyboard Settings | Configure the “Hotkeys” and their functions here. |
| OLE Settings: Linked | A file linked with audio data retains the file name and path of the dictation file, resulting in a smaller amount of data. The file may not be able to be played if it cannot refer to the audio data path. |
| OLE Settings: Embedded | An embedded object brings all audio data into the file, resulting in a larger amount of data. The file with audio data embedded can be played on another PC that has DSS Player installed. |
| Options | Opens the options settings, containing all the configuration details for the ODMS software. |
Voice Recognition

| Menu | Function |
| Do Real-time Voice Recognition | Opens the Real-time voice recognition window, this is used to actively transcribe what the audio says. |
| Start Recognition Queue | Will begin voice recognition of audio files that have been queued for “Voice Recognition”. Transcribing dictations in the background whilst still allowing use of the ODMS software. |
| Stop Recognition Queue | Will halt all voice recognition of audio files queued for “Voice Recognition”. |
| Move to the Top Position | This will move an audio file in the “Voice Recognition Waiting List” to the top of the list, so when the voice recognition queue is started, this dictation will be processed first. |
| Requeue | When an audio file has gone through the voice recognition process, it will appear in the “Voice Recognition Result List”, from there, using this option it can be requeued to re-transcribe the audio file. |
| Details | This option opens the details of the selected audio file in the “Voice Recognition Result List”, such as whether or not voice recognition was successful or if there was an error. |
| Adapt All Files | Any audio files set for adaptation will start to go through the adaptation process, essentially training the DNS profile. |
| Do Vocabulary Adaptation | This will perform the “Vocabulary Adaptation” of an audio file within the “Adaptation Waiting List”, primarily adapting the DNS profile to the vocabulary of the user. |
| Do Acoustic Adaptation | This will perform the “Acoustic Adaptation” of an audio file within the “Adaptation Waiting List”, primarily adapting the DNS profile to the acoustics of the user. |
| Remove from the Queue | Removes the selected audio file from the relevant queue. |
| Clear the Queue | Removes all audio files from the queue. |
| Voice Recognition Settings | Opens the option settings for voice recognition, where all configuration settings for voice recognition are stored. |
Device
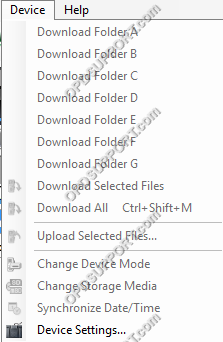
| Menu | Function |
| Download Folder A-G | Downloads files from the connected device to the PC. |
| Download Selected Files | Downloads selected files into the ODMS software. To select multiple files, select an audio file then hold “Ctrl” and select other audio files to be downloaded. |
| Download All | Downloads all files from the connected device into the Olympus software. |
| Upload Selected Files | Uploads selected files into the connected device. To select multiple files, select an audio file then hold “Ctrl” and select other audio files to be downloaded. |
| Change Device Mode: Composite | Whilst in “Composite” mode, the device is recognised as three devices, a “Storage” device, an “Input” device and an “Output” device. |
| Change Device Mode: Storage | Whilst in “Storage” mode, the device is recognised only as a “Storage” device, allowing access to the audio files on the memory card(s). |
| Change Storage Media | Changes the active memory currently being accessed, between the primary “SD Memory Card” and the secondary “MicroSD memory card”. |
| Synchronize Date/Time | Changes the Date/Time on the device to match the set Date/Time of the PC the device is connected to. |
| Device Settings | Opens the “Device” tab in the option menu settings, all settings that apply to the device can be configured here. |
Help
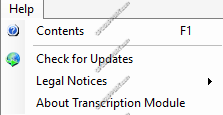
| Menu | Function |
| Contents | Displays a dialogue that contains detailed information on the ODMS software. |
| Check for Updates | Checks the Olympus update server for the latest version of software, if the user is already on the latest version it will not update the software, if the user can update, this will prompt the user to see whether or not they want to update the software or not. |
| Device Manual Download Site | Opens the Olympus “Downloads” web page in the default web browser. |
| About Transcription Module | Opens a dialogue detailing the User ID, Company Name, License key (used to install the software) & version of the ODMS software currently installed. |
The following will explain the components within the Playback Control panel. Please follow the below descriptions from left to right on the picture.

1 Playback Controls: Skip to Start > Previous “Index Mark” > Rewind.
2 Playback Controls: Play/Pause.
3 Playback Controls: Fast forward > Next “Index Mark” > Skip to end.
4 Volume Control: This control is used to change the playback volume of an audio file.
A Playback Control Bar: This bar shows where in the audio file a user is, where index marks are within the audio file and shows the full length of an audio file.
1 Priority: This sets priority on an audio file, making the audio file appear at the top of the content list.
2 Instruction Comment: This switches to the Instruction Comment playback bar, allowing playback of an Instruction Comment attached to an audio file.
3 Information: This displays the information of an audio file, such as File Name, Size, Duration, File format, Audio format, whether it has an Instruction Comment or not and whether the file is encrypted or locked.
4 Settings: This displays the Playback Control configuration settings in the options menu under the “User Settings” tab allowing the configuration of the Playback Control panel.
5 Volume Level Meter: This displays the levels at which the microphone registers user input.
B Audio Control options: These options change the way audio files are played back (speed, tone & noise cancellation).
5 Playback Speed: This controls the speed at which the audio file is played back.
6 Noise Cancellation: There are 3 levels of “Noise Cancellation”, this feature removes background noise from the audio playback.
7 Tone Control: This controls the “Tone” of the dictation while playing an audio file back.
This section details how to customise the Folder’s and Folder Settings.
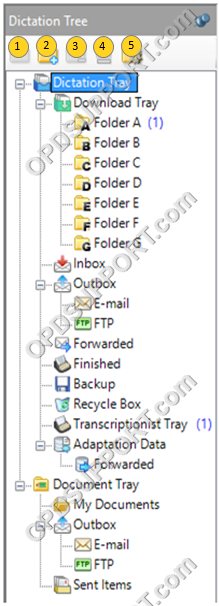
1 New Folder: This creates a “New Folder” / “Sub Folder” for audio files to be stored in. Via this feature, you can setup a folder structure to support your specific needs, for more information on creating folder structure click here
2 Add Folder: Using this feature, an additional folder can be added into the ODMS software to be used for storage of audio files.
3 Remove Folder: Using this feature, a folder can be removed/deleted from the ODMS software. Additionally, to remove a folder, you can manually delete it from the location within Windows by browsing to the parent folder via Windows Explorer, then deleting the folder.
4 Rename Folder: A folder can be renamed using this feature.
5 Folder Settings: This opens the “Folder Design” settings within the ODMS option settings, these settings control the configuration details of all folder attributes.
This displays the contents of the selected folder within the “Dictation Tree” or a selected folder within a devices “Voice Folders”, as demonstrated below, within “Typing PoolDepartment 1” there is an audio file named “Test_File1.ds2”.

Audio files are presented in alphabetical order via the File Name, Author, Worktype and other attributes. The audio files can also be filtered via Author ID(s), Worktype(s), duration, date created and more, using the “Filter” feature and enabling the renaming of audio files via the “In-line Edit” feature.
Also, if open, the “Properties Window” will display the details on an audio file or one of the folders within the “Dictation Tray”. To open the “Properties Window”, click on the “<<” button, or click on “View” > “Property Window”.

Also in the properties panel, the “Job History” can be displayed, this will detail what actions have been carried out within the ODMS software and what time they were performed.

The device manager section contains options and features pertaining to the currently connected device. From this section it is possible to download from, upload to and configure a device.

1 Download: Downloads all files from the device, into the relevant folder(s) within the ODMS software.
2 Upload: This option uploads the selected file(s) stored on the PC within the ODMS software to the currently connected device.
3 Change Device Mode: Changes the device mode between “Composite” & “Storage”…
4 Change Storage Media: Changes the selected memory within the device, between the SD & MicroSD card’s within the connected device.
5 Synchronise Date/Time: Synchronizes the Date/Time on the device with the Date/Time set on the PC the device is connected to.
6 Device Settings: This option opens the “Device” tab within the ODMS software, here all the settings to do with devices can be configured.
The document list displays all document files that have been associated with a dictation or transcribed using “Voice Recognition”. It also shows files that have been sent for “Adaptation” to improve voice recognition accuracy.

1 Voice Recognition Waiting List: This displays all audio files that have been set to be transcribed via the Dragon Naturally Speaking software.
2 Voice Recognition Result List: This displays the results of audio files that were set for Voice Recognition and that have finished being transcribed by the Dragon Naturally Speaking software.
3 Adaptation List: This displays audio files that have been set for Adaptation. Adaptation is where an audio file is taken by the Dragon Naturally Speaking software and used to train the profile, without the interaction of a user.
4 Mail Preview: This shows a preview of the e-mail to which the selected audio file or document was attached.
5 Document List View: This enables the option to show associated documents and documents that have been transcribed via voice recognition.

 Switch to Playback Control Window