This article goes through the basics of using your RecMic II Series.
Getting Familiar with the Device
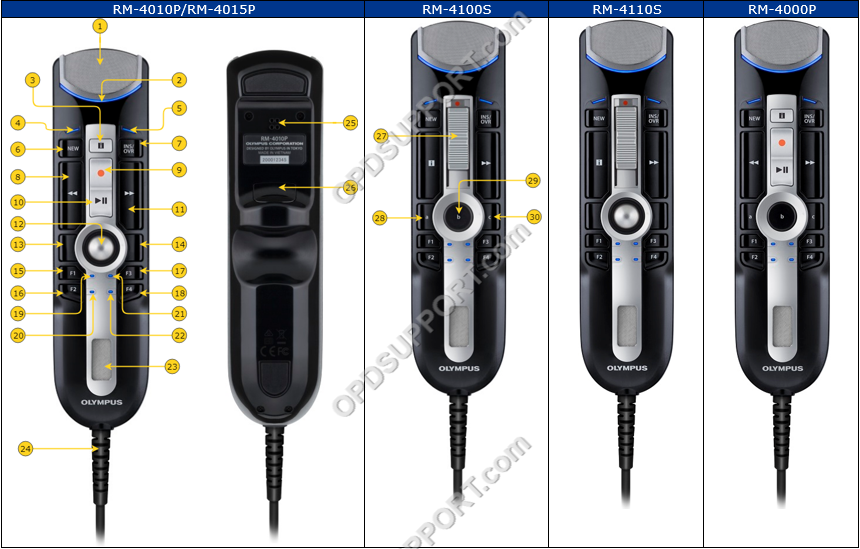
| 1 Primary microphone |
16 F2 (Function 2) button |
| 2 Recording three colour LED (red, green and blue) |
17 F3 (Function 3) button |
| 3 Insert index mark |
18 F4 (Function 4) button |
| 4 NEW LED (blue) |
19 F1 LED (blue) |
| 5 INS/OVR LED (red) |
20 F2 LED (blue) |
| 6 NEW button |
21 F3 LED (blue) |
| 7 Insert / Overwrite button |
22 F4 LED (blue) |
| 8 Rewind button |
23 Built-in speaker |
| 9 Record button |
24 USB cable |
| 10 Play/Pause button |
25 Secondary microphone |
| 11 Fast Forward button |
26 Back button |
| 12 Trackball |
27 Slide Record/Stop/Play/Review switch |
| 13 Left button |
28 A (Function a) button |
| 14 Right button |
29 B (Function b) button |
| 15 F1 (Function 1) button |
30 C (Function c) button |
How to create a dictation
- With the Olympus software open, press the “NEW” button on the RecMic to open the Direct Recording Window.

- Push the slide switch to the “REC” position and start dictating.
- To pause a dictation, move the slide switch back to the “STOP” position.
- To resume dictating, move the slide switch back to the “REC” position. This will continue with the same dictation.
Overwriting a dictation
- Move the slide switch into the “REV” position, this will rewind into the dictation.
- Press the “INSERT/OVER” button to select the required mode.To overwrite ensure the overwrite icon is displayed.

- When you reach the beginning of the section you want to overwrite, move the slide switch into the “REC” position.
Inserting a dictation
- Move the slide switch into the “REV” position, this will rewind into the dictation.
- Press the “INSERT/OVER” button to select the required mode. To insert additional recordings into a dictation ensure the insert icon is displayed.

- When you reach the beginning of the section you wish to begin the insertion, move the slide switch into the “REC” position.
Partial erase a dictation
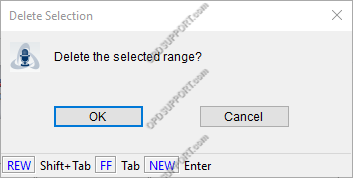
- Slide the record duration bar to the start point of where you want to erase the file and click Start partial erase.

- Next slide record duration bar to the end point of where you want to erase the file then click execute partial erase

- You will be prompted to confirm the partial erase click OK to continue or click Cancel to quit the partial erase.
Ending a dictation
- If you want to end the dictation select one of the options Finished, Pending or Cancel.

- If you have finished the recording, click Finished this will prompt you to name the file and select a folder to save the recording to.
- If you want to continue the recording later click Pending and this will save the file to the recording folder for you to come back to.
- If you want to quit the recording, then click Cancel and you will be prompted if you wish to save the file.
- If you click Save you will prompted to select either Finished or Pending and save the file accordingly.
- If you click Cancel this will delete the recording.
How to create a dictation
- With the Olympus software open, press the “NEW” button on the RecMic to open the Direct Recording Window.
- Press the “REC” button and start dictating.
- To pause a dictation, press the “PLAY/PAUSE”
- To resume dictating, press the “REC” position. This will continue with the same dictation.
Overwriting a dictation
- Press the “REW” position, this will rewind into the dictation.
- Press the “INSERT/OVER” button to select the required mode. To overwrite ensure the overwrite icon is displayed.
- When you reach the beginning of the section you want to overwrite, press the “REC” position.
Inserting a dictation
- Press the “REW” position, this will rewind into the dictation.
- Press the “INSERT/OVER” button to select the required mode. To insert additional recordings into a dictation ensure the insert icon is displayed.
- When you reach the beginning of the section you wish to begin the insertion, press the “REC” position.
Partial erase a dictation
- Slide the record duration bar to the start point of where you want to erase the file and click Start partial erase.
- Next slide record duration bar to the end point of where you want to erase the file then click Execute partial erase.
- You will be prompted to confirm the partial erase click OK to continue or click Cancel to quit the partial erase.
Ending a dictation
- If you want to end the dictation select one of the options Finished, Pending or Cancel.
- If you have finished the recording, click Finished this will prompt you to name the file and select a folder to save the recording to.
- If you want to continue the recording later click Pending and this will save the file to the recording folder for you to come back to.
- If you want to quit the recording, then click Cancel and you will be prompted if you wish to save the file.
- If you click Save you will prompted to select either Finished or Pending status and save the file accordingly.
- If you click Cancel this will delete the recording.
Sending your dictations
Once you have created your recordings you can send them via the following methods. The ODMS R8/R7 software has automated functions which can be configured for a seamless workflow.
Further information
If you want to know about the Olympus software please take a look at the ODMS R8/R7 GUI Overview
