
Auf der folgenden Seite werden die folgenden Aspekte der ODMS CLOUD Desktop App-Schnittstelle erläutert.
- Resident-Programm
- Wiedergabeleiste
- Anzeigeeigenschaft
- Einstellung für die automatische Rücktaste
- Menü „Einstellungen“
1). Resident-Programm
Nach der Installation der Desktop-App wird diese als residentes Programm registriert. Beim nächsten Start Ihres PCs wird es automatisch resident sein und ein ![]() Das Symbol wird in der Taskleiste angezeigt.
Das Symbol wird in der Taskleiste angezeigt.
2). Spielleiste
Wenn Sie sich über einen Webbrowser bei ODMS Cloud anmelden und die Registerkarte [Diktat] öffnen, werden Diktatdateien aufgelistet. Wählen Sie eine Datei aus und klicken Sie auf die Schaltfläche [Wiedergabe], um die Wiedergabeleiste zu starten.

[Normale Schaltfläche]
| Symbol | Erläuterung |
| Prioritätstaste Zeigt die Priorität (Hoch/Normal) an. Rot bedeutet hohe Priorität. | |
| Zur vorherigen Indexmarke oder zum Ende des verbalen Kommentars wechseln. | |
| spulen Sie die Datei zurück. Klicken und halten Sie, um die Geschwindigkeit zu erhöhen. Die Beschleunigungseinstellungen folgen der Spulgeschwindigkeit im Dialogfeld „Einstellungen“. | |
| Wiedergabe-/Stopp-Taste. Zeigt während der Wiedergabe Stopp an. Bei jedem Klicken auf die Taste wechselt sie von Stopp → Wiedergabe → Stopp… | |
| Schneller Vorlauf von Dateien. Klicken und halten Sie, um die Geschwindigkeit zu erhöhen. Die Beschleunigungseinstellungen richten sich nach der Spulgeschwindigkeit im Dialogfeld „Einstellungen“. | |
| Zur nächsten Indexmarke oder zum Ende des verbalen Kommentars wechseln. | |
| Anzeige der Spielzeit. Die aktuelle Wiedergabeposition wird im Format HH:MM:SS (Standard: MM:SS) angezeigt. | |
| Balken und Positionsregler. Zeigt die aktuelle Wiedergabeposition der Datei an. Der Bereich vom Anfang bis zur aktuellen Wiedergabeposition wird blau angezeigt, der Bereich für verbale Kommentare wird hellgrün angezeigt. | |
| IndexmarkenanzeigeGibt die Einfügeposition der Indexmarke an. | |
| Symbol | Erläuterung |
| Volumen Zeigen Sie den Schieberegler an, indem Sie auf das Lautsprechersymbol klicken. Bewegen Sie den Schieberegler nach links oder rechts, um die Lautstärke anzupassen. 0%~100%. | |
| Geschwindigkeitsregelung Zeigen Sie den Schieberegler an, indem Sie auf das Metronomsymbol klicken. Klicken Sie auf die Schaltfläche „+“ oder „-“, um die Wiedergabegeschwindigkeit zu ändern. (50%~100%~200%, in 10%-Schritten). | |
| Geräuschunterdrückung Zeigen Sie den Schieberegler an, indem Sie auf das Symbol klicken. Klicken Sie auf die Schaltfläche „+“ oder „-“, um den Geräuschunterdrückungspegel einzustellen. (AUS, 1, 2, 3) | |
| Klangregelung Zeigen Sie den Schieberegler an, indem Sie auf das Symbol klicken. Klicken Sie auf die Schaltfläche „+“ oder „-“, um den Ton anzupassen. (-100~AUS~+100 in 10%-Schritten) | |
| LautsprecherauswahlWenn mehrere Lautsprechergeräte an Ihren PC angeschlossen sind, wird der Lautsprecherausgang bei jedem Klick auf die Schaltfläche umgeschaltet.Beispiel: Gerät->PC->Kopfhörer | |
| Kanaltrennungs-Steuertaste Mit jedem Klick auf die Schaltfläche wird der Kanal zwischen Stereo, links, rechts und Mono umgeschaltet. (Oben) → | |
  | Index einfügen/löschen Klicken Sie auf die Schaltfläche an einer Stelle, an der keine Markierung angezeigt wird, wird eine Indexmarkierung eingefügt. Klicken Sie auf die Schaltfläche an der markierten Stelle, wird diese gelöscht. |
| Schaltfläche „Eigenschaften anzeigen/ausblenden“: Blenden Sie die Dateieigenschaften bei jedem Klicken auf die Schaltfläche ein oder aus. | |
| Schaltfläche „Schließen“, Wiedergabeleiste verlassen. | |
| Umschalten der Optionsschaltfläche: Zeigen oder verbergen Sie die Optionsschaltfläche. | |
| Auswählen von AreaKnobs zum Verschieben der Wiedergabeleiste. |
Wenn Sie den Cursor zu den vier Ecken der Leiste bewegen, wird ein Cursor zur Größenänderung angezeigt.
Durch Ziehen in diesem Zustand können Sie die Breite der Leiste von 50% auf 200% (festes Seitenverhältnis) ändern.
50%

100%

200%

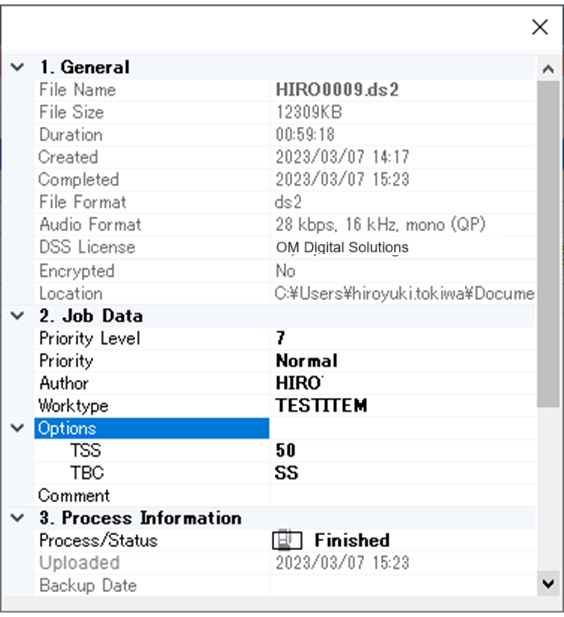
3). Eigenschaft anzeigen
Sie können die detaillierten Informationen der Diktatdatei überprüfen, indem Sie auf die Schaltfläche [Info] klicken. ![]()
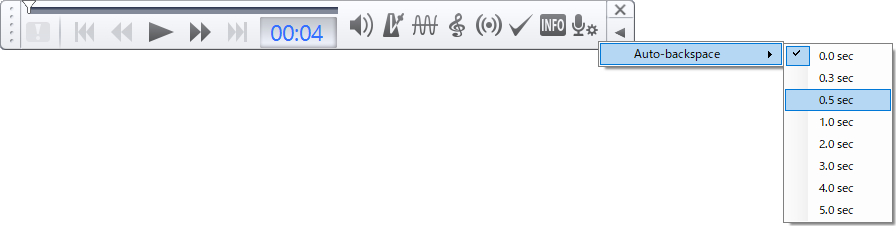
4). Einstellung für die automatische Rücktaste
Die Funktion „Automatische Rücktaste“ ist nützlich, wenn Sie zurückgehen und Audio wiedergeben möchten, das Sie nicht hören konnten. Wenn Sie die Wiedergabe stoppen und erneut auf die Wiedergabetaste klicken, können Sie die Wiedergabe ab der angegebenen Zeit wieder aufnehmen.
Um die Rückwärtszeit einzustellen, klicken Sie mit der rechten Maustaste (Strg+Klick auf dem Mac) auf die Wiedergabeleiste, um das Auswahlmenü für die automatische Rücktaste anzuzeigen.
- Konfigurierbare Einstellung: 0,0, 0,3, 0,5, 1,0, 1,0, 3,0, 4,0 oder 5,0 Sekunden
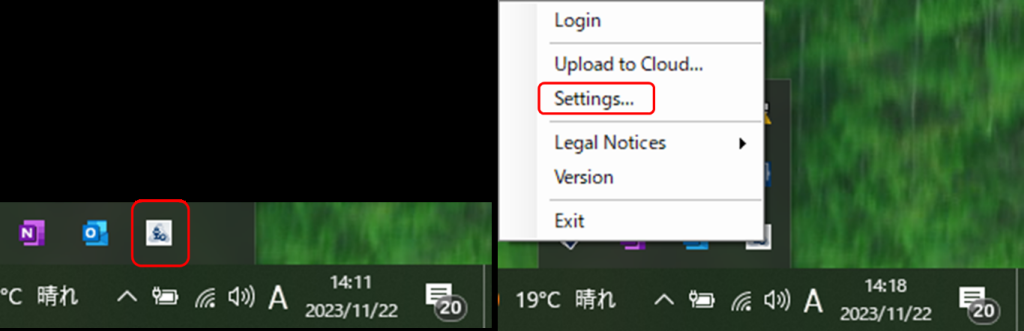
5). Einstellungsmenü
Klicken Sie mit der rechten Maustaste auf das ODMS Cloud-Symbol in der Taskleiste, um das Menü anzuzeigen.
【Allgemein】
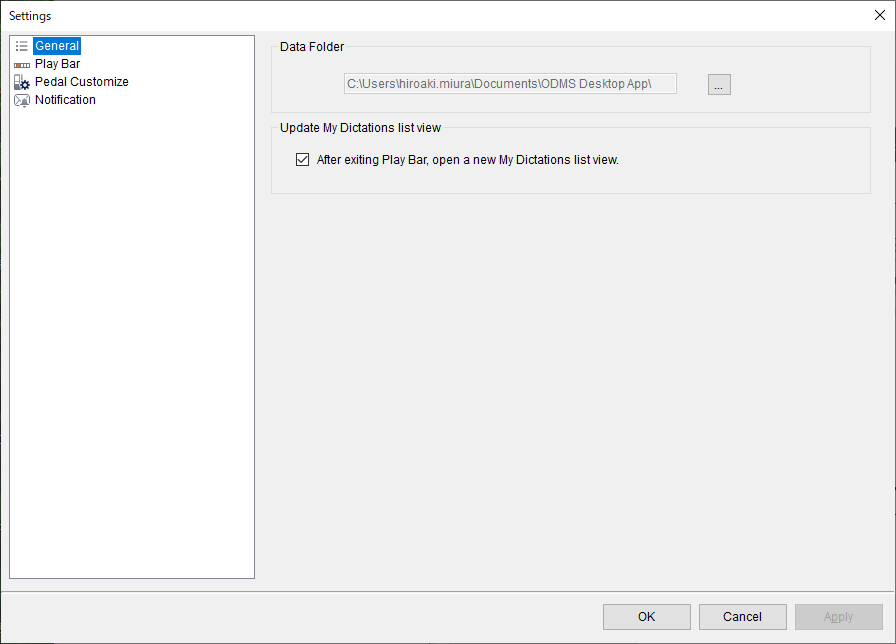
Datenordner:
Dies ist das Speicherziel für vom Rekorder heruntergeladene Dateien. Die Diktatdatei wird einmal in diesen Ordner heruntergeladen und nach Abschluss des Downloads in die ODMS-Cloud hochgeladen.
Aktualisieren Sie die Listenansicht „Mein Diktat“:
Legen Sie fest, ob eine neue Registerkarte auf dem ODMS Cloud-Web-Bildschirm geöffnet werden soll, wenn Sie die Transkription abgeschlossen und die Wiedergabeleiste geschlossen haben. Der Web-Bildschirm kann nicht automatisch aktualisiert werden, daher müssen Sie eine neue Registerkarte öffnen, um die Informationen zu aktualisieren. Wenn Sie keine neue Registerkarte öffnen möchten, deaktivieren Sie sie und klicken Sie auf ![]() Schaltfläche zum Aktualisieren des Browsers.
Schaltfläche zum Aktualisieren des Browsers.
Wiedergabeleiste】
Wiedergabeleiste】

Automatische Rücktaste:
Stellen Sie mit der automatischen Rücktaste die Rückkehrzeit ein.
Position der Wiedergabeleiste:
Aktivieren Sie diese Option, wenn Sie die Play Bar im Vordergrund des Bildschirms anzeigen möchten.
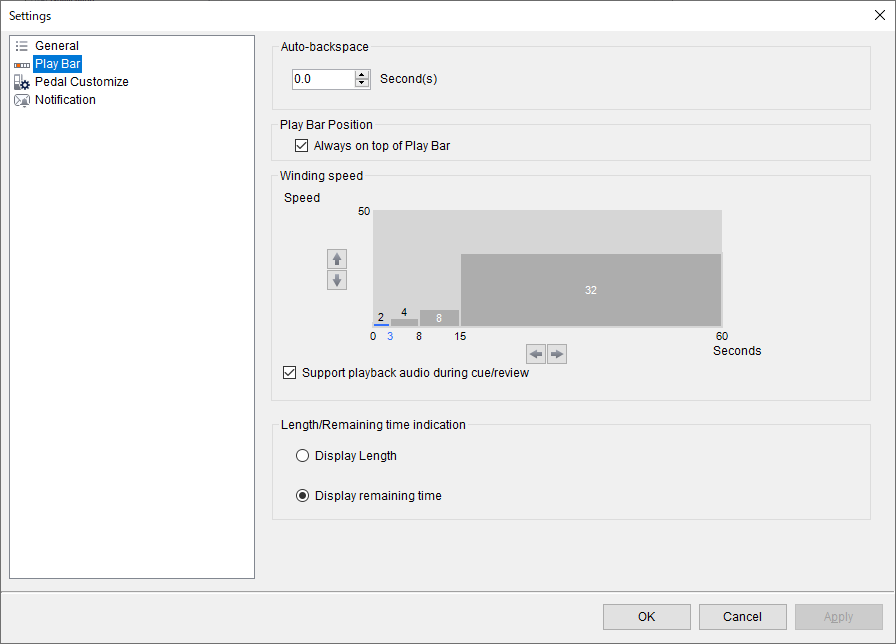
Spulgeschwindigkeit:
Cue/Rewind einstellen. Die Cue/Rewind-Funktion der ODMS Cloud Desktop App ist nützlich, wenn Sie das gewünschte Audio schnell finden möchten, indem Sie wiederholt abspielen → springen → abspielen. Bei langen Dateien ist sie so konzipiert, dass sie über einen bestimmten Zeitraum beschleunigt. Die Wiedergabe- und Sprungeinstellungen können nach Ihren Wünschen angepasst werden. Um die Einstellungen zu ändern, klicken Sie auf die Schaltflächen ↑, ↓, ← und →.
・Geben Sie die Sprungzeit auf der vertikalen Achse des Einstellungsbildschirms an. Im folgenden Beispiel ist der Sprung zunächst auf 2 Sekunden eingestellt.
・Im folgenden Beispiel springt Cue/Rewind 3 Sekunden nach dem Start um 2 Sekunden und nach der 3. Sekunde um 4 Sekunden. Nach der 8. Sekunde erfolgt ein Sprung von 8 Sekunden und ab der 16. Sekunde ein Sprung von 32 Sekunden.
Wenn Sie während Cue/Rewind keine Audiowiedergabe benötigen, deaktivieren Sie das Kontrollkästchen „Audiowiedergabe während Cue/Rewind unterstützen“.
Längen-/Restzeitanzeige:
Stellen Sie diese Option so ein, dass im Kapitel zur Anzeige der Wiedergabezeit in der Wiedergabeleiste die Informationen „Dateilänge“ oder „Restzeit“ angezeigt werden.
【E-Mail】
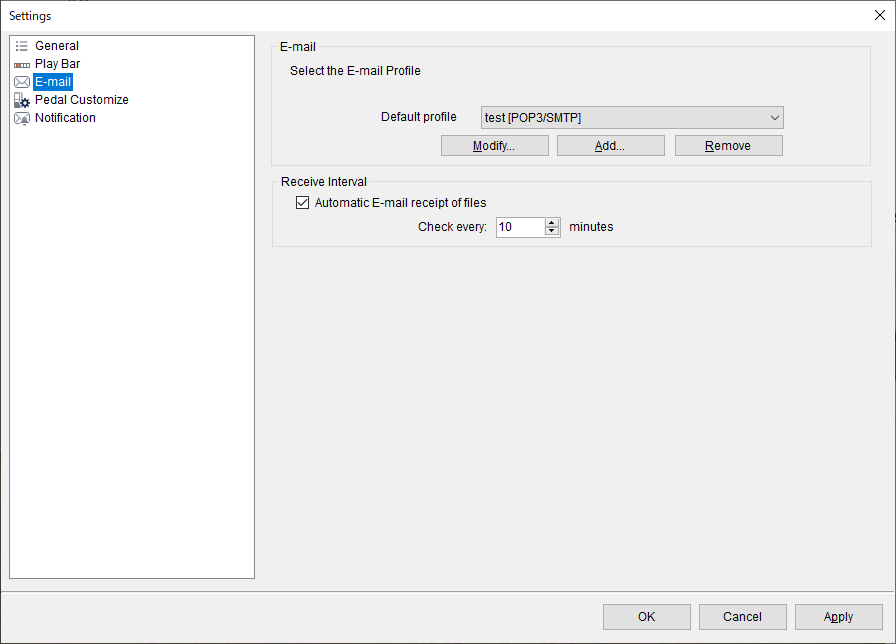
E-Mail:
Konfigurieren Sie die Einstellungen für den Empfang von E-Mails, die vom DS-9500 gesendet werden. Die Einstellungen variieren je nach verwendetem E-Mail-Typ. Weitere Informationen finden Sie in den Informationen zum E-Mail-Konto.
Empfangsintervall:
Legen Sie das Intervall für den automatischen E-Mail-Empfang fest.
【Pedal anpassen】 (nur für Transkriptionisten)
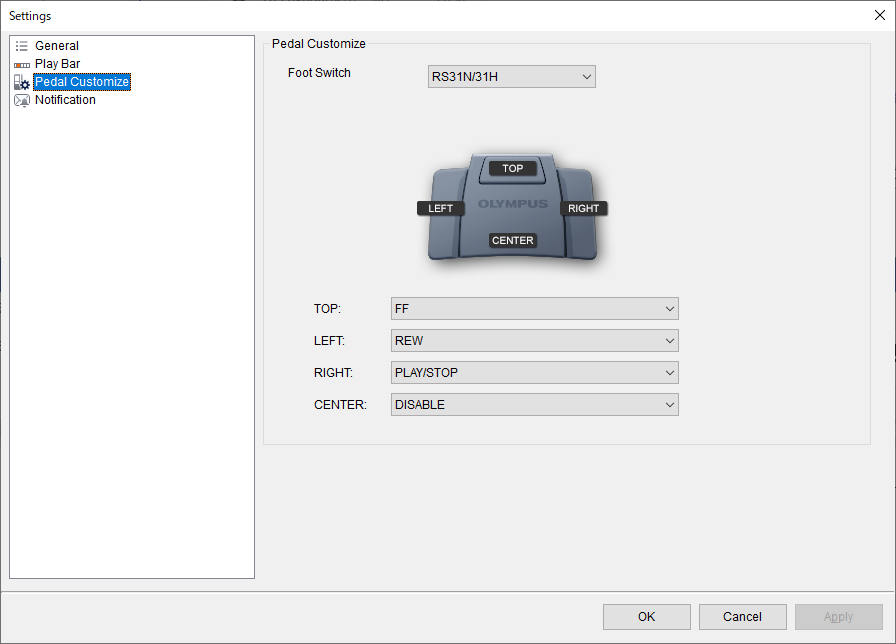
Pedale anpassen:
Stellen Sie die Funktion des angeschlossenen Fußschalters ein. Wählen Sie ein Modell aus und legen Sie das Verhalten jeder Taste fest.
【Ton】 (nur für Transkriptionisten)
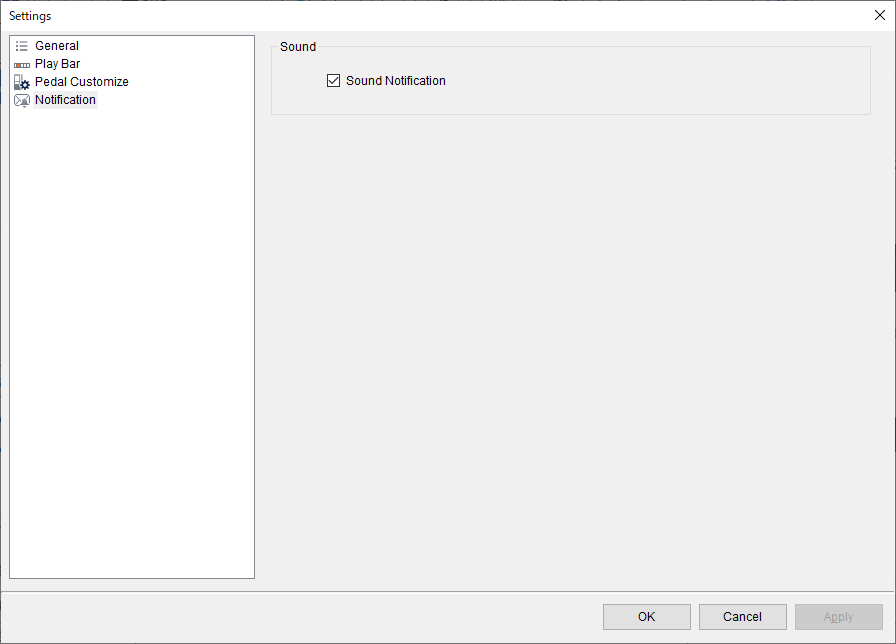
Klang:
Steuert den Benachrichtigungston beim Empfang von Benachrichtigungen, z. B. Benachrichtigungen zu neuen Diktieraufgaben. Wenn Sie keinen Ton benötigen, deaktivieren Sie das Kontrollkästchen.